The main goal of the Unattended ECR Connector is to create a transaction from your kiosk using an unattended terminal.
Workflow
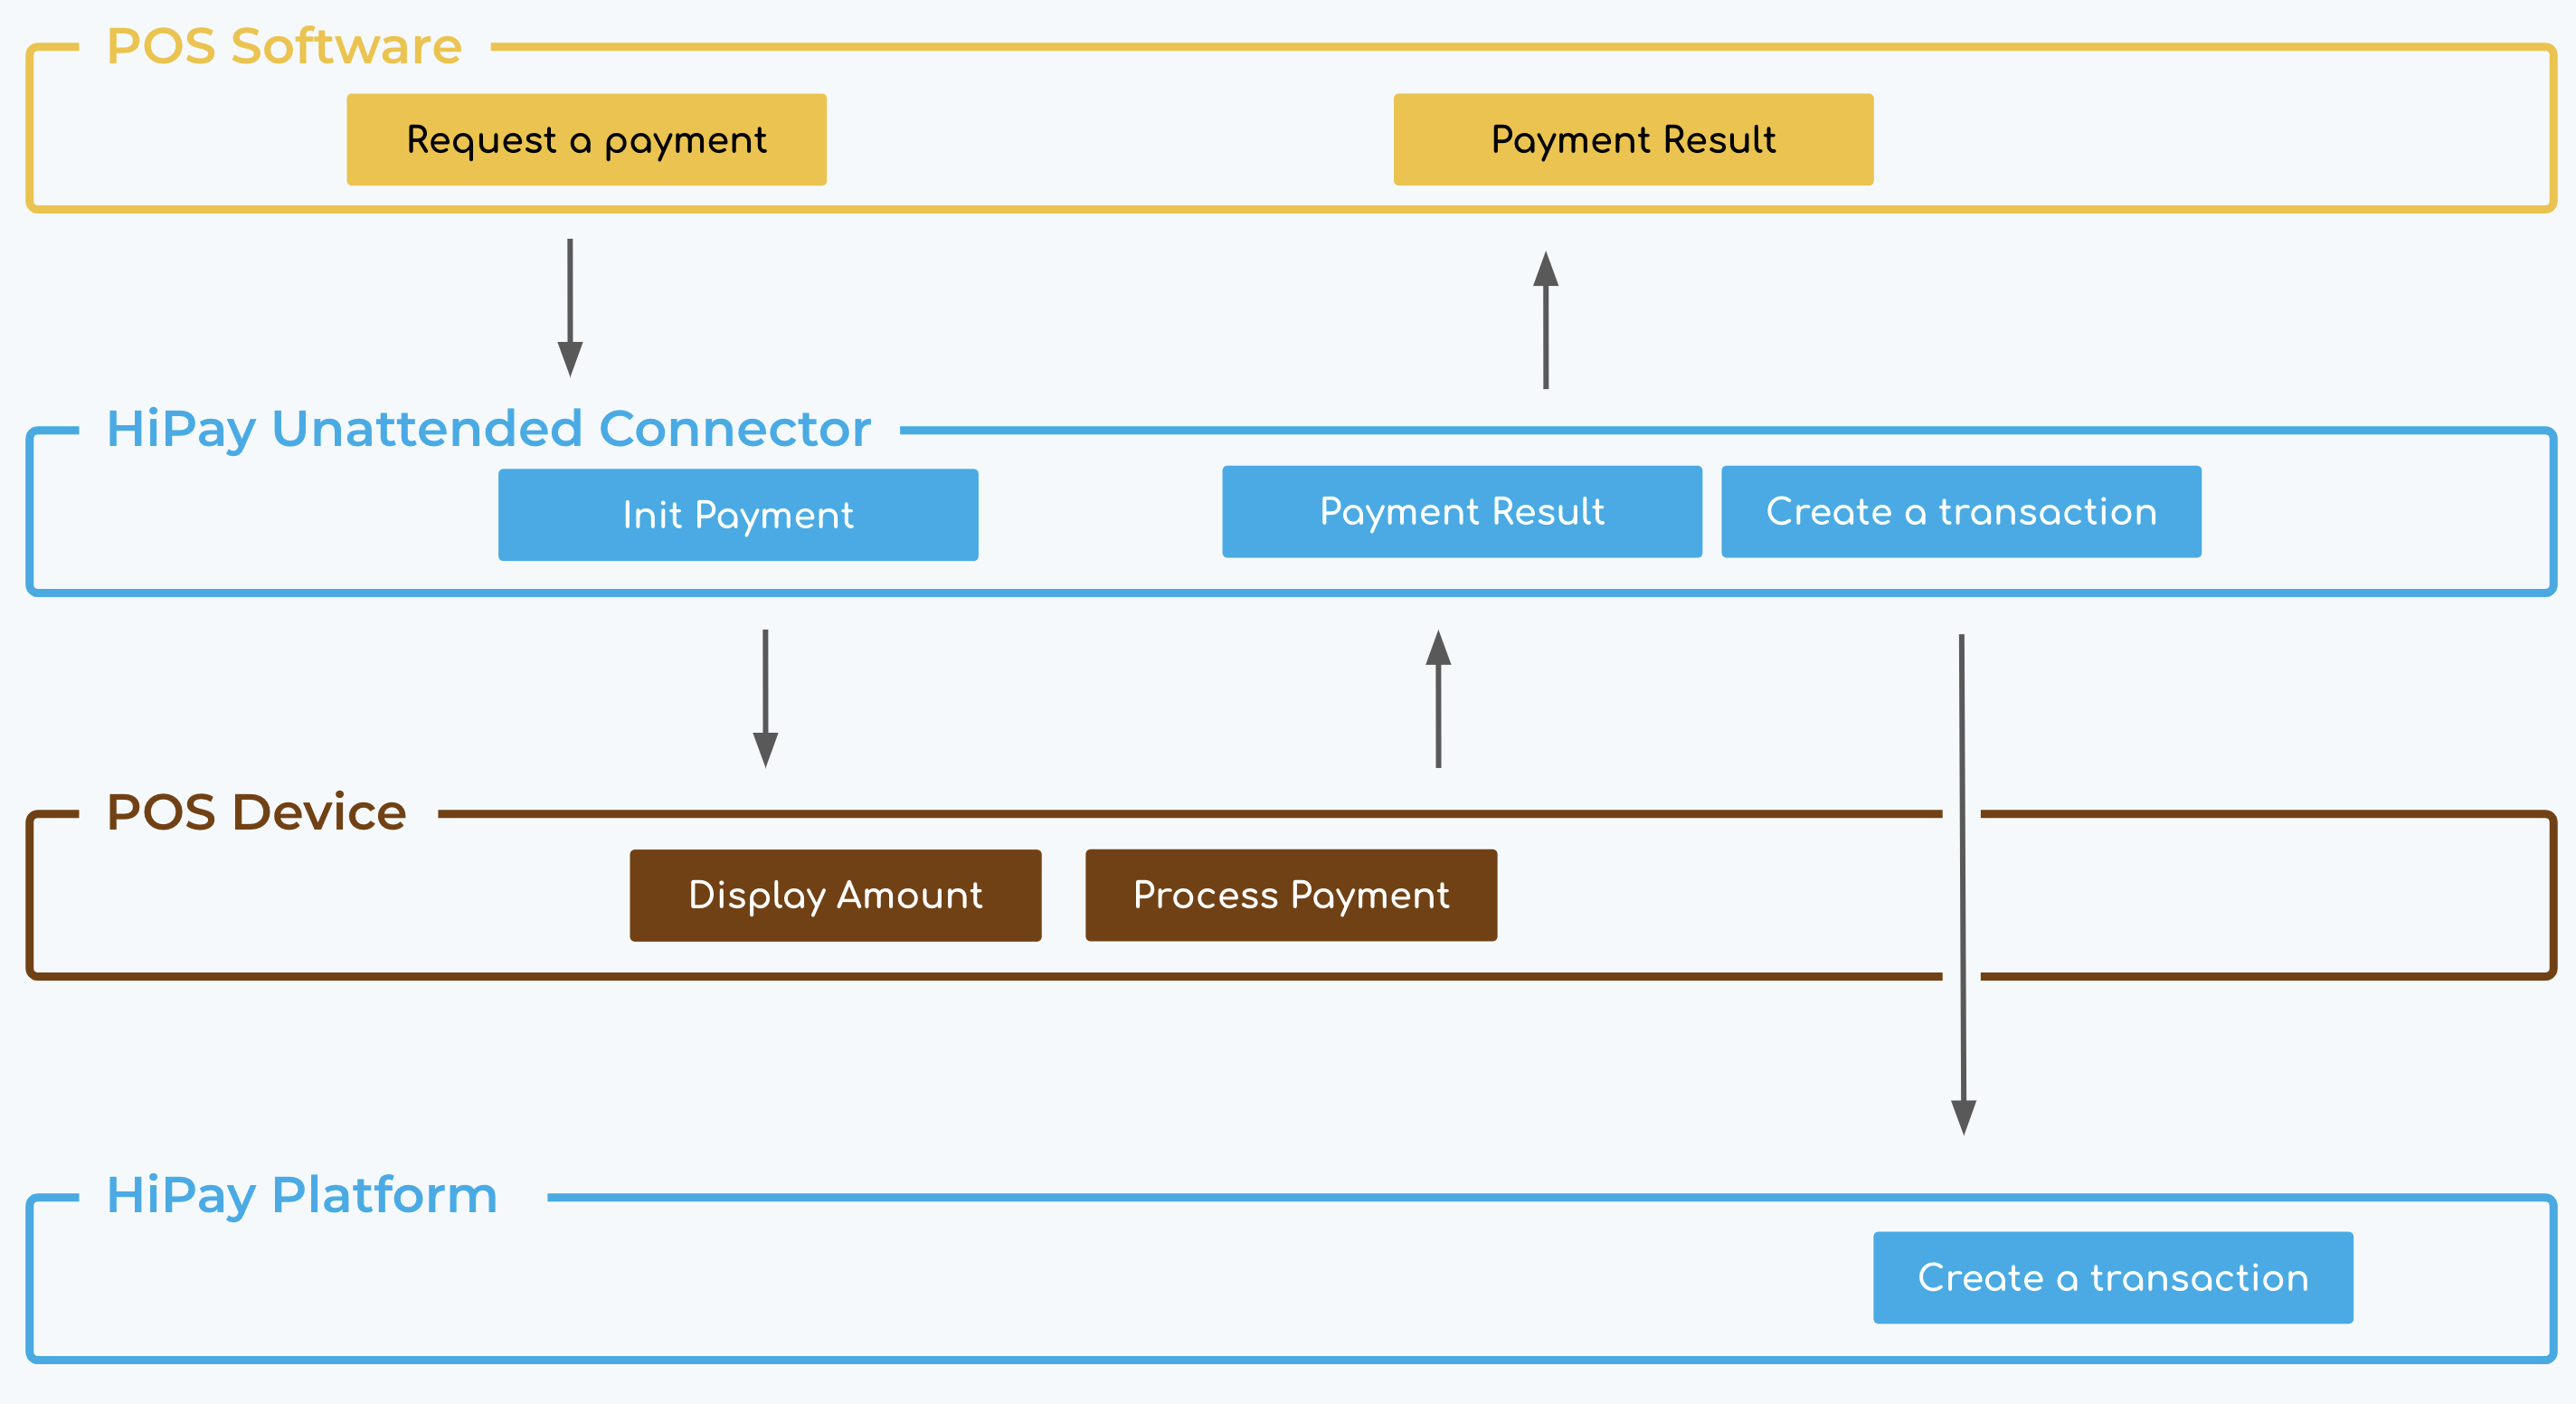
The kiosk software sends a request payment to the ECR Connector.
The ECR Connector initializes the payment on the unattended Terminal e.g the amount is displayed on the screen and the customer should process the payment.
The Unattended Terminal sends the payment result to the ECR Connector.
The ECR Connector sends the result to the kiosk software.
The Transaction request is sent to HiPay’s server
Requirements
- Windows 10 with x64 processor
- Unattended terminal : iUP250 or iUP250LE, iUR250, iUC150B
- Ubuntu 18.04
- Unattended terminal : iUP250 or iUP250LE, iUR250, iUC150B
Installation
Download the Unattended ECR Connector file from this URL depending on environment using your private or public API Credentials:
header "x-authorization: Basic {API_CREDENTIALS}"
Exemple:
Stage
curl "https://stage-api.hipay.com/v1/ecr/versions/setup?os=winserver2003_64" --header "x-authorization: Basic {API_CREDENTIALS}" --output setup-tpa-winserver2003_64.zipProduction
curl "https://api.hipay.com/v1/ecr/versions/setup?os=winserver2003_64" --header "x-authorization: Basic {API_CREDENTIALS}" --output setup-tpa-winserver2003_64.zipWhere {API_CREDENTIALS} : base64(login:password)
Then, unzip the file to the destination directory
Download the Unattended ECR Connector file from this URL depending on environment using your private or public API Credentials:
header 'x-authorization: Basic {API_CREDENTIALS}'
Exemple:
Stage
curl 'https://stage-api.hipay.com/v1/ecr/versions/setup?os=linux' --header 'x-authorization: Basic {API_CREDENTIALS}' --output setup-tpa-linux.zipProduction
curl 'https://api.hipay.com/v1/ecr/versions/setup?os=linux' --header 'x-authorization: Basic {API_CREDENTIALS}' --output setup-tpa-linux.zipWhere {API_CREDENTIALS} : base64(login:password)
Then, unzip the file to the destination directory
Initialization
Windows
Identify the port used by the terminal
If you don’t know the local port used by the unattended terminal, please start your terminal and connect it to the windows computer who runs the ECR connector.
Then, download and install the USBDeview software from this URL. When launching the USBDeview software, you can identify the local port in the Drive letter column from a device name that becomes green when you plug the terminal.
In this example the local port is COM8

Fill in the setup file
You have to set the setup file named config.txt which is located into the data directory. The different information needed for the setup file are the following ones.
| Variable name | Description | Type | Value example |
| SERIAL_PORT | Serial port used by the terminal | String | COM8 |
| LOCAL_PORT | The port used by the connector to handle the local API | Integer | 8080 |
| TERMINAL_MANAGER_LOGIN | The login used to secure the access to the local API with Basic Auth | String | log |
| TERMINAL_MANAGER_PWD | The password used to secure the access to the local API with Basic Auth | String | pwd |
| HIPAY_LOGIN | Public HiPay API username used by authentication | String | 99999999.stage-secure-gateway.hipay-tpp.com |
| HIPAY_PWD | Public HiPay API password used by authentication | String | Test_XXXXXXXXXXXXXXXXXXXXXXXX |
| UPDATE_TIME | Connector update time with hh:mm format | Time | 04:00 |
Manual ECR connector launch
In order to check if the configuration is well done and everything works fine, you have to launch the ECR connector manually by executing program launch.cmd located on delivery files at the root directory.
The following program is started:
- tp-manager: who’s role is to drive device,
- supervisor: who’s role is to communicate between tp-manager and HiPay.
If one of these programs stop few seconds after started, it occurs one failure during the program start. Please check again the previous step to modify the configuration.
Kill manually tp-manager and supervisor before to start next step.
Automate the ECR connector launch
You can automate the ECR connector launch from the computer who runs the ECR connector following the next steps:
Click on Start menu > Windows Administrative Tools > Task Scheduler.
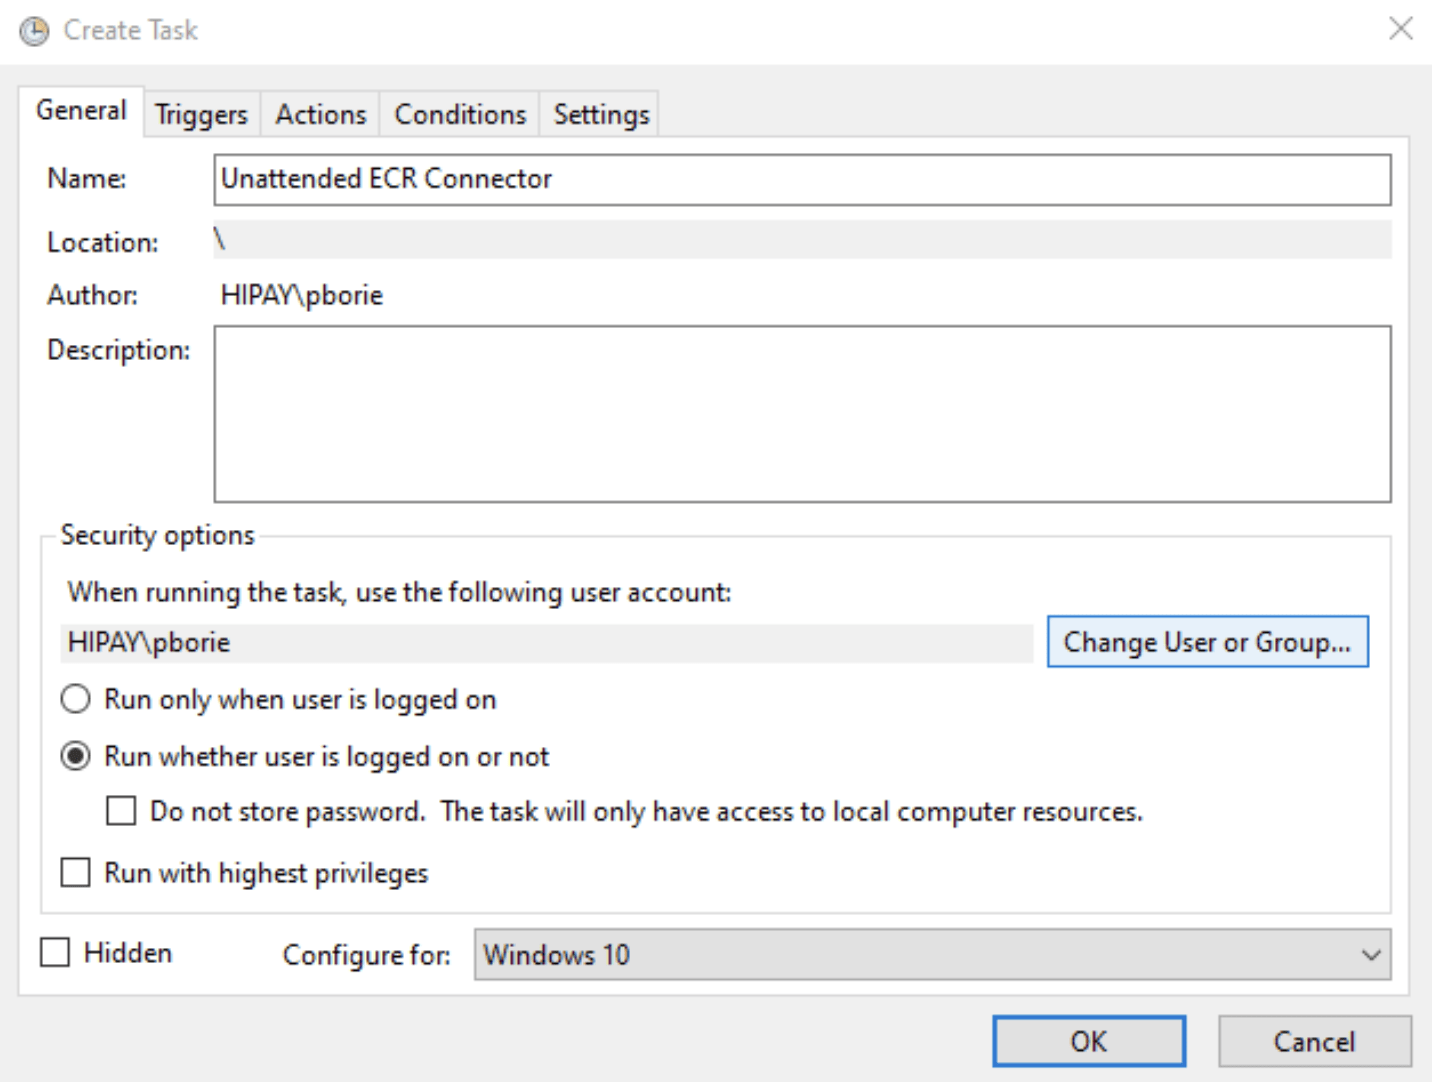
Click on Action > Create Task
Once the Create Task screen appears, in the “Name” field, give the task name : Unattended ECR Connector.
Select the option “Run whether user is logged on or not”.
In the “Configure for” drop down menu, select “Windows 10.
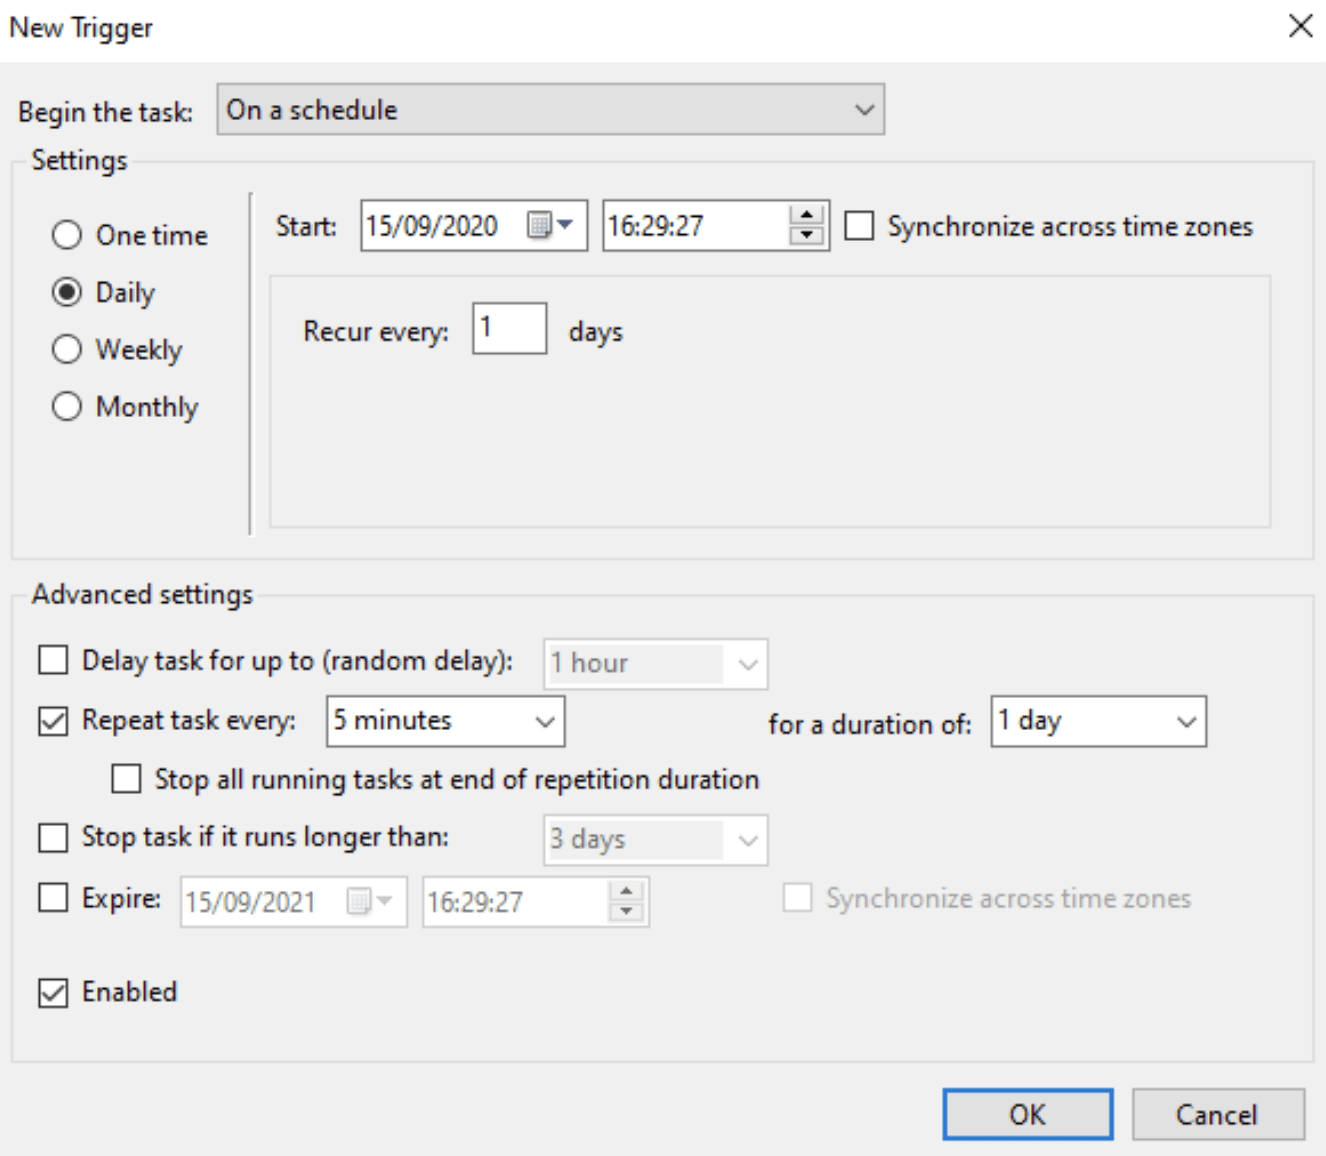
6. Go to the “Triggers” tab and select “New…”.
7. Select “Daily” Settings and let “Recur every” 1 days
8. In advanced settings, enable “Repeat task every” and select in the drop down menu “5 minutes”
9. Go to the “Actions” Tab and select “New …”.
10. Select “Browse…“ and find the program “always-up” (located on delivery files at the root directory) and click on the button “Open” to select this file to be scheduled for this task.
11. Select “OK“.
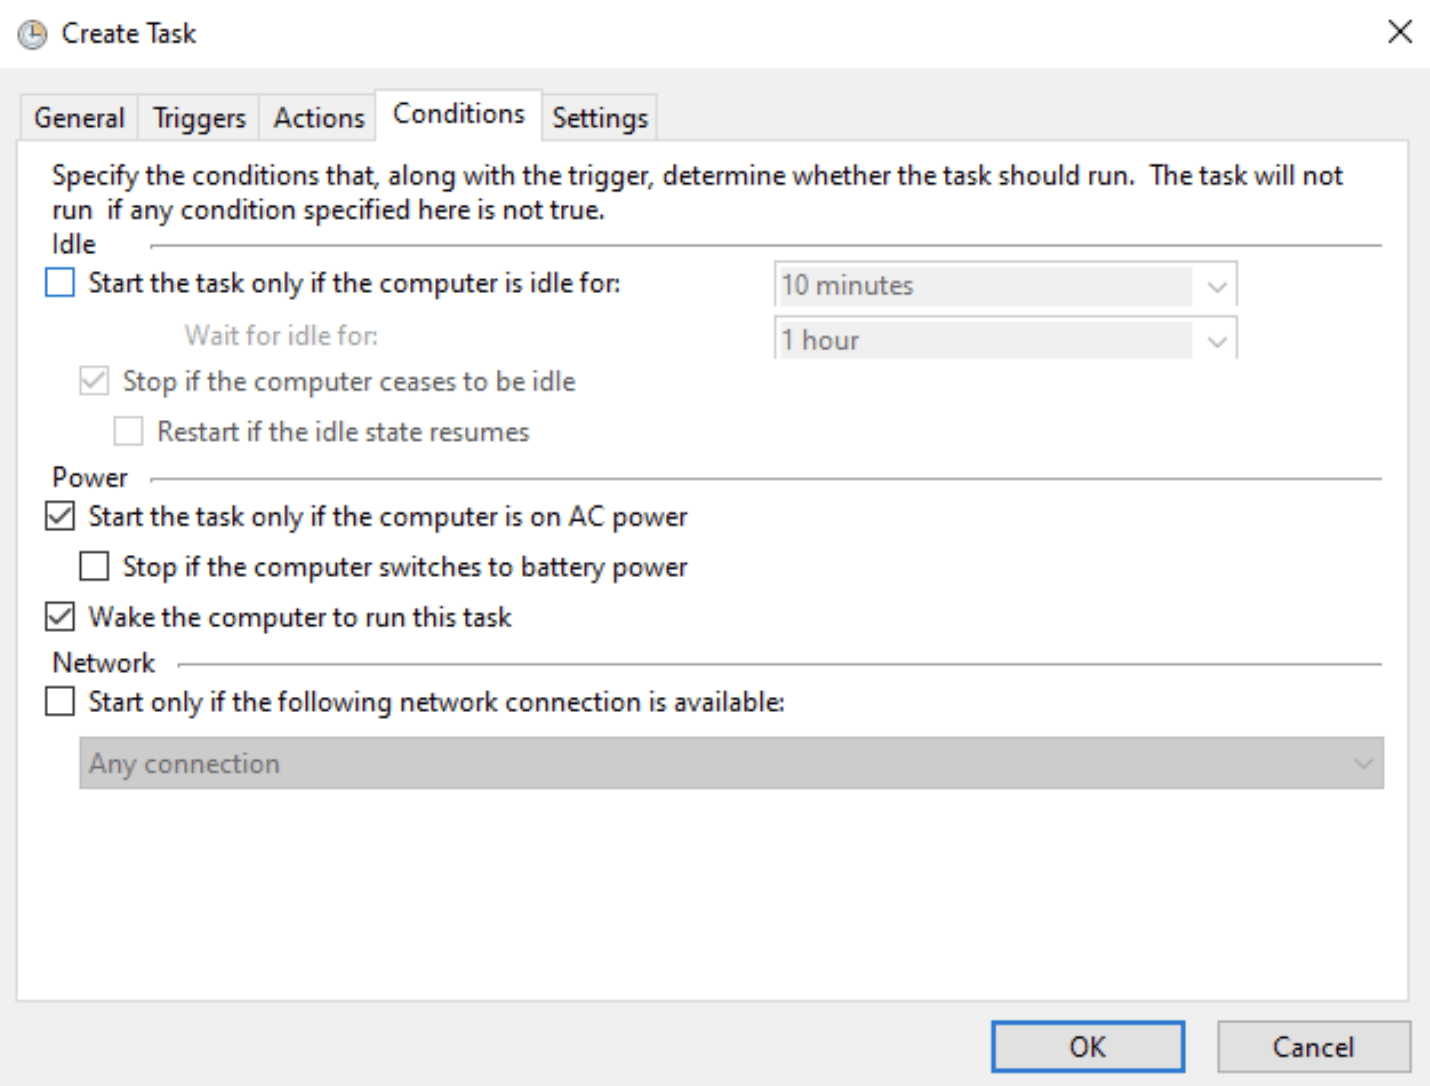
12. Go to the “Conditions” Tab.
13. Enable “Wake the computer to run this task”
14. Disable “Stop if the computer switches to battery power”
15. Then go to the “General” tab and Click on “OK”
16. The “Task Scheduler” login screen will appear.
17. Enter your password to enable the program to start on your computer and click on “Ok”.
The new task “Unattended ECR Connector” is ready and will start in few minutes.
Linux
Identify the port used by the terminal
If you don’t know the local port used by the unattended terminal, please compare 2 devices lists:
- before connecting the terminal (cmd> ls /dev)
- after connecting the terminal (cmd> ls /dev)
The new device that appears in the second list is the unattended terminal device.
Example : /dev/ttyUSB0
Grant the access to the port used by the terminal
You need to add the dialout group to the port used by the terminal in order to access this port. Type this unix command (and replace USER by the login used to launch this connector software) :
sudo usermod -a -G dialout USER
Fill in the setup file
You have to set the setup file named config.txt which is located into the data directory. Here you have the different data of the file.
| Variable name | Description | Type | Value example |
| SERIAL_PORT | Serial port used by the terminal | String | /dev/ttyUSB0 |
| LOCAL_PORT | The port used by the connector to handle the local API | Integer | 8080 |
| TERMINAL_MANAGER_LOGIN | The login used to secure the access to the local API with Basic Auth | String | log |
| TERMINAL_MANAGER_PWD | The password used to secure the access to the local API with Basic Auth | String | pwd |
| HIPAY_LOGIN | Public HiPay API username used by authentication | String | 99999999.stage-secure-gateway.hipay-tpp.com |
| HIPAY_PWD | Public HiPay API password used by authentication | String | Test_XXXXXXXXXXXXXXXXXXXXXXXX |
| UPDATE_TIME | Connector update time with hh:mm format | Time | 04:00 |
Manual connector launch
In order to check if the configuration is well done and everything works, you have to launch the connector manually by executing program launch.sh located on delivery files at the root directory.
The following program is started:
- tp-manager: who’s role is to drive device,
- supervisor: who’s role is to communicate between tp-manager and HiPay.
If one of these programs stop few seconds after started, it occurs one failure during the program start. Please check again the previous step to modify the configuration.
Kill manually tp-manager and supervisor before to start next step.
- Automate connector launch
From your computer who run the connector, add a new line into the cron to schedule a new task that run every 2 minutes via the command crontab -e (and replace the directory /home/user/ecr/ by your own directory where you have installed the connector software) :
*/2 * * * * /home/user/ecr/always-up.sh
Request
The Unattended ECR Connector allows you to:
make a payment which is following by an order if the payment succeed,
manage terminal with terminal maintenance call.
URL
The Unattended ECR Connector URL is:
Following the previous configuration example, the URL would be http://localhost:8080
Authentication
All requests to the Unattended ECR Connector require identification through HTTP Basic Authentication. Your API credentials can be found in the “Integration section” of your HiPay Enterprise back office. Most HTTP clients (including web browsers) have built-in support for HTTP basic authentication. If not, the following header must be included in all HTTP requests.
Authorization: Basic base64(‘API login’)
The response is given synchronously following the request.
REQUEST
| Variable name | Description | Type | Values | Default |
| amount* | Total order amount, calculated as the sum of purchased items, plus shipping fees (if present), plus tax fees (if present). | Float | e.g. 9.99 | |
| orderId* | Order number of your request payment. If you don’t send an identifier, we will generated it for you | String | e.g. “Order_12345” | |
| currency | ISO 4217 alpha currency code (More information) | Enum | EUR | EUR |
| basket** | Cart object (More information) | Cart | – | |
| customer | Customer’s information object (id, firstName, lastName, email) | Customer | – | |
| customData | Custom data (only value type Bool / Int / Float / String are accepted) | Dictionary | – |
* Mandatory
** If the cart content is not correctly fulfilled or doesn’t match the total amount of the order, the order will be created with an empty cart.
{
  "amount": 100,
  "orderId": "Order_12345",
  "currency": "EUR",
  "basket": {
    "european_article_numbering": 4711892728946,
    "product_reference": "NF-a1690",
    "type": "good",
    "quantity": 1,
    "name": "My first product",
    "unit_price": 8.99,
    "tax_rate": 0,
    "discount": 0,
    "total_amount": 8.99
  },
  "customer": {
    "id": 283749291,
    "firstname": "John",
    "lastname": "Doe",
    "email": "[email protected]"
  },
  "customData": {
    "shop": "Opera",
    "vendor": "Mario",
    "newCustomer": true,
    "event": 42
  }
}
Payment Response
Here you can find an exemple of a 200 – OK Response.
[
  {
    "status": "Success",
    "error": null,
    "receipt": {
      "ticketHeader": "                    ",
      "localDate": "030420",
      "localTime": "083011",
      "acceptor": "HIPAY                                 92HIPAY             ",
      "transactionType": "01",
      "contractNumber": "123456",
      "SIRET": "12345678901234",
      "activity": "5039",
      "paymentType": "46",
      "siteType": "        ",
      "primaryAccountNumber": "123456XXXXXX7890",
      "TASA": "2046",
      "cardAppExpiry": "221031",
      "serviceCode": "   ",
      "crypto": "1234567898765434",
      "currencyNumCode": "978",
      "acceptationSystemNum": "001",
      "transactionNumber": "000001",
      "transactionFileNumber": "000006",
      "readingMode": "C",
      "authorizationNumber": "136967",
      "forceCode": " ",
      "amount": "00000899",
      "currencyAlphaCode": "EUR",
      "currencyFractionPart": "2",
      "counterValueAmount": "00005897",
      "counterValueCurrencyAlphaCode": "FRF",
      "counterValueCurrencyFractionPart": "2",
      "inclusiveAmount": "00000899",
      "ticketFooter": "                                       ",
      "AID": "A0000000041010  ",
      "label": "Mastercard      "
    },
    "ticket": "CARTE BANCAIRE|A0000000041010Mastercard|LE 28/11/19 A 11:06:17|HIPAY |92HIPAY |123456 39033123454322345|XXXXXXXXXXXX1234   1234567899765|001 000001 03 C |@|NO AUTO:122603|MONTANT REEL:1,00 EUR|MONTANT ESTIME:8,99 EUR|DEBIT|TICKET CLIENT A CONSERVER||",
    "amount": 100,
    "currency": "EUR",
    "orderId": "Order_12345",
    "basket": {
      "european_article_numbering": 4711892728946,
      "product_reference": "NF-a1690",
      "type": "good",
      "quantity": 1,
      "name": "My first product",
      "unit_price": 8.99,
      "tax_rate": 0,
      "discount": 0,
      "total_amount": 8.99
    },
    "customer": {
      "id": 283749291,
      "firstname": "John",
      "lastname": "Doe",
      "email": "[email protected]"
    },
    "customData": {
      "shop": "Opera",
      "vendor": "Mario",
      "newCustomer": true,
      "event": 42
    },
    "notificationHipaySent": true
  }
]
Maintenance
In addition to the payment, the unattended terminal connector allows you to perform the maintenance operations below.
GET /cancel
Cancel current transaction.
GET /stop
Stop the terminal manager server.
GET /reset
Ask terminal to male a reboot.
GET /version
Get the current version of the terminal manager application.
[
  {
    "version": "0.0.0-tpa-winserver2003_64",
    "type": "tpa",
    "os": "winserver2003_64"
  }
]
GET /config
Get serial number of hardware terminal.
[
  {
    "version": "0.0.0-tpa-winserver2003_64",
    "type": "tpa",
    "os": "winserver2003_64"
  }
]
GET /tlc
Telecollection. Data capture request.
[
  {
    "NbApp": "1",
    "App": [
      {
        "Name": "CB EMV",
        "Status": "0"
      }
    ]
  }
]
GET /check
Check the hardware terminal status.
[
  {
    "cr": "0",
    "card": "0",
    "call": "0",
    "periph": "0"
  }
]