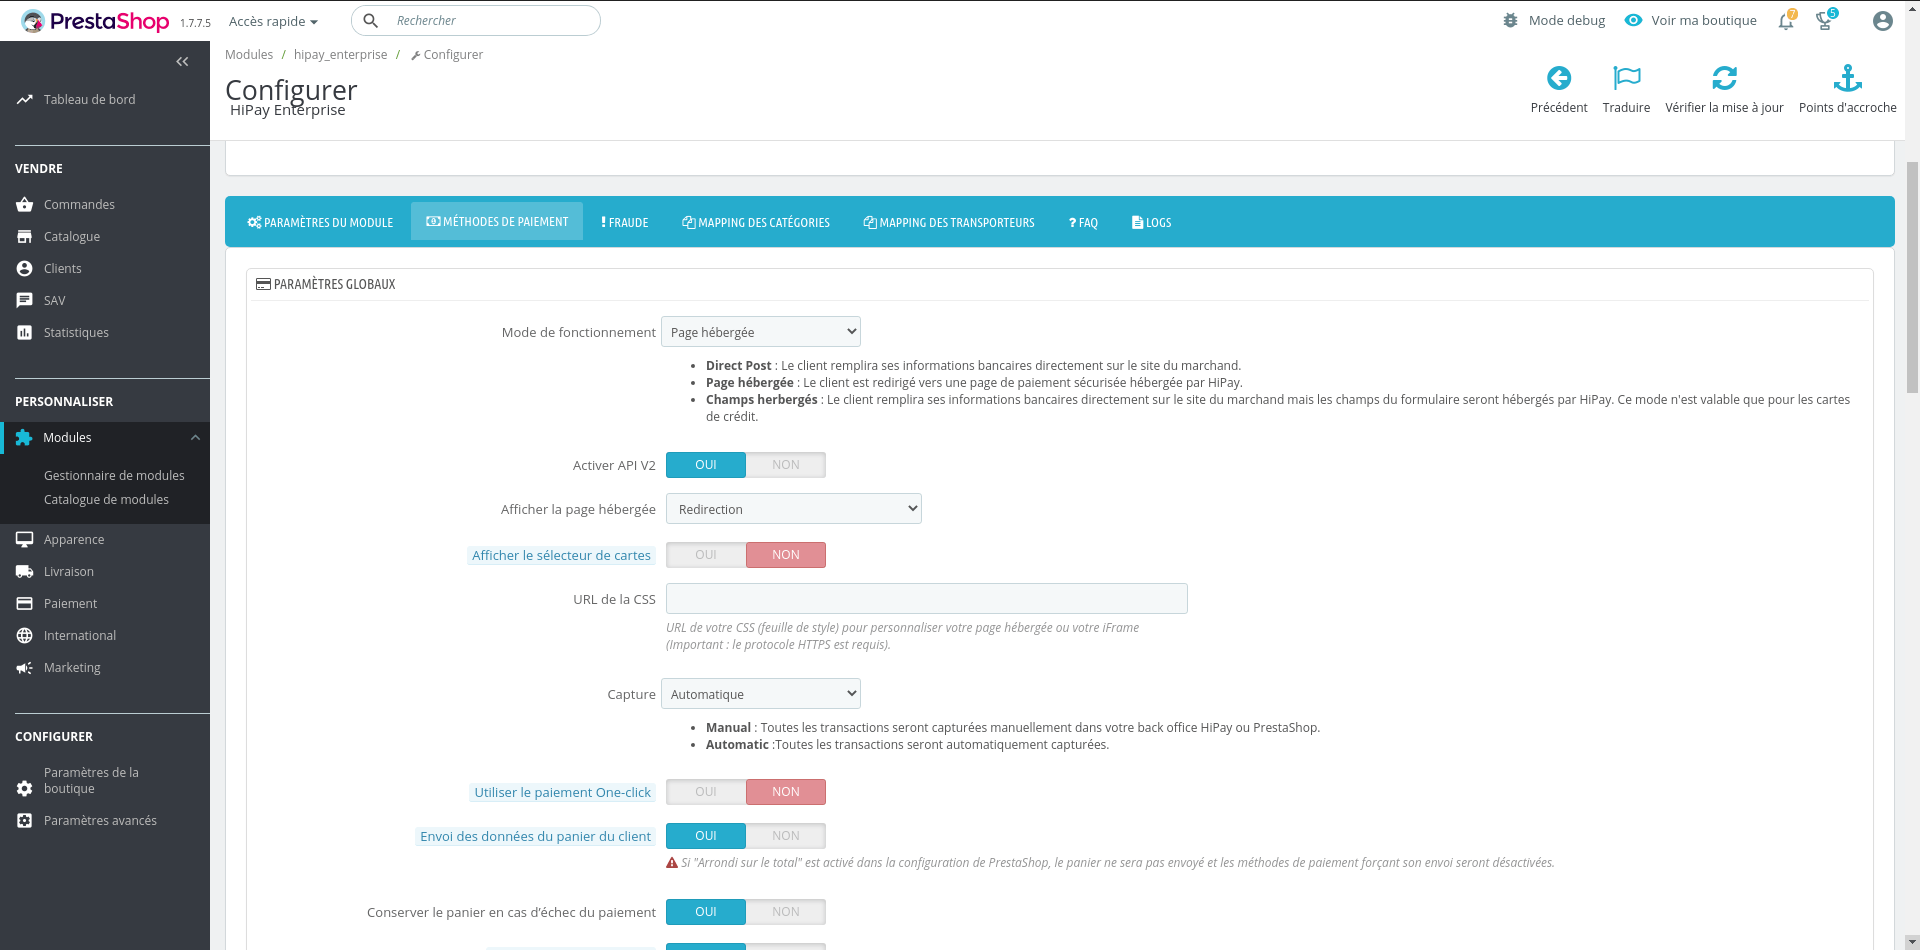
PrestaShop Enterprise

The HiPay Enterprise module for PrestaShop 1.7.x / 8.x is a PHP module which allows you to accept payments in your PrestaShop online store, offering innovative features to reduce shopping cart abandonment rates, optimize success rates and enhance the purchasing process on merchants’ sites to significantly increase business volumes without additional investments in the PrestaShop e-commerce CMS solution.

Please make sure you go through the CMS Prerequisites article before stating the integration.

Compatible from Prestashop Version: 1.7.6.x

Module features

      • 3-D Secure enabling/disabling
      • One-click option configuration with custom rules
      • Management of multiple cards per customer for one-click payment
      • Available integration types: iFrame, Hosted Page, Hosted Fields and API
      • Mail management for transactions pending fraud validation (“challenged”)
      • Manual and automatic capture
      • Partial capture and refund
      • Custom data management (easily send and view your data in your HiPay Enterprise back office)
    • Payment Means

PrestaShop module management

Get the installation package

Recommended solution

Download the ZIP package “package-ready-for-prestashop/hipay-enterprise-2.X.X.zip_” available in the hipay/hipay-enterprise-sdk-prestashop project.

Alternative solution

Download the latest release in the release section: https://github.com/hipay/hipay-enterprise-sdk-prestashop/releases.

      1. Open your ZIP package and extract the project on your desktop.
      2. Execute “build-package.sh“ with a version number in the “./build-package.sh” parameter.
      3. Voilà! “hipay-enterprise.zip“ is now in the folder.

Upload the module via PrestaShop module management 

To install it in your PrestaShop administrator back office, click on “Modules -> Modules & Services -> Upload a module“.

Choose the package and click on “Upload this module“.

Upload the module via FTP (SFTP) 

You must have a file transfer software like “FileZilla“ for example.

      1. Open your software and connect to your FTP (SFTP).
      2. Go to the root of your PrestaShop project.
      3. Transfer the “hipay_enterprise“ source module in the “/modules/“ folder.
      4. Add write permissions recursively to the folder “hipay_enterprise” (766).

Install the module in the PrestaShop back office 

With PrestaShop 1.7.X or 8.X, the module is automatically installed after being uploaded via the back office.

Module configuration

Access to configuration

PrestaShop 1.7 / 8

To configure your HiPay Enterprise module, click on “Modules -> Modules” in your PrestaShop back office, then on “Installed modules“:

Gateway configuration

This setting is very important: it allows to define whether payments will be executed on the HiPay test or production platform. By default, the module is in TEST mode. In test mode, payments are therefore not actually executed. We strongly advise you to perform tests before launching your site in production mode.

Production configuration

Use this interface to specify the credentials linked to your HiPay account. These identifiers are used if your module is configured in production mode. Generated in your HiPay Enterprise back office (go to “Integration” => “Security Settings” => “Api credentials” => “Credentials accessibility”), these API credentials are required to use the HiPay Enterprise module. Account (Private) Private credentials are used to process payments on the HiPay API. These identifiers are mandatory. Tokenization (Public) Public credentials are used as part of the JavaScript tokenization. These identifiers are to be specified only if you can use the module in API mode and if your infrastructure is PCI compliant. MO/TO account credentials If defined, these identifiers will be used when making payments via the back office.

Sandbox configuration

The interface is similar to the production configuration. These identifiers are used if your module is configured in test mode.

Hash Algorithm

The hash algorithm is used when checking the signature. You can configure it in your back office Hipay the algorithm of your choice. This interface makes it easy to synchronize the configuration made on your back office HiPay. Configurations are retrieved from your identifiers in “Production configuration” and “Sandbox configuration”

Proxy settings

When your server is behind a proxy, you must populate the information so that the modules can communicate with the HiPay Gateway. Retrieve this information from your host and fill in the following information: Host, Port, Username and password.

PSD2 & SCA

As of September 14, 2019, the issuer will decide if a payment is processed depending on the analysis of more than 150 data collected during the purchasing process. Thanks to our Prestashop 1.7.x / 8.x module we handle most of the data without you having to develop anything. You can see all the new parameters on our explorer API.

Adding or overriding PSD2 data 

The accuracy of the information sent is key for making sure that your customers have a frictionless payment process. That’s why we provide you the possibility to add or override all the information related to the PSD2.

We trigger the event “actionHipayApiRequest” that can be listened to using another module.

It is called with two parameters: the request sent to the HiPay API and the current cart ordered by the customer.

You can either implement the observer in your own modules or use the one that we provide. You can find this additional module on our github repository.

You can install this module in a classic way, then directly modify the file “hipay_enterprise_data.php” and the method “hookActionHipayApiRequest” to add your information.

Be careful ! If there is an update of the data module, remember to save your data so that it is not overwritten.

Finally, although we do our best to retieve all relevant data for you, we are not capable of getting the following data as it depends on the modules installed on your CMS or your workflow.

Merchant risk statement  

Field   Comment
delivery_time_frame  

The field is managed but only for virtual products.
We send “1 = Electronic delivery” if it is downloadable or virtual product.

Depending on your carrier and delivery methods, you can refine this data.

Possible values:

1 = Electronic delivery
2 = Same day shipping
3 = Overnight shipping
4 = Two-day or more shipping

shipping_indicator  

This fields is managed but you can refine the value for dematerialized products.

If the basket contains only virtual products, please provide:

5 = Digital goods
6 = Travel and event tickets, no shipping
7 = Other (gaming, digital services without shipping, e-media subscription)

gift_card   If you sell gift card products
  amount Collect the amount of gift card type gift cards purchased.
  count Collect the count of gift card type gift cards purchased.
  currency Collect the currency of gift card type gift cards purchased.

If you want to see all the parameters you are able to override, please refer to the SDK PHP Reference.

Module settings

Mapping 

The customer’s basket information can be sent during the transaction if you enabled the option in the global settings. This mapping is necessary to establish a correlation between your data and HiPay’s. It is mandatory to do all the mappings to use the Oney Facily Pay or Klarna payment methods. If you add new categories or delivery methods, make sure to match the new corresponding data.

Category mapping

Top-level product categories are displayed. You must match each of them with the corresponding HiPay categories.

All sub-categories will also be mapped when you commit your matchings.

Carrier mapping  

All the delivery methods active on your shop are listed. For each of them, you must fill in the necessary corresponding information.

This information is used to calculate an approximate delivery date.

NameDescriptionValue
Order preparation estimated timeEstimated time to prepare your ordersTime of day
Delivery estimated timeEstimated time for deliveryTime of day
HiPay delivery modeDelivery mode– store: At the store
– carrier: Delivery by carrier
– relaypoint: Delivery in a pick-up location
– electronic: To be filled in
– travel: To be filled in
HiPay delivery methodDelivery method– standard
– express
– Priority 24H
– Priority 2H
– Priority 1H
– Instant

Fraud screening

Based on the screening results of HiPay’s Fraud Protection Service, when a transaction is suspected of being fraudulent, it is in “challenged“ status. 


Payment methods

After configuring the necessary information, this interface allows you to set the payment methods that will be available to your customers.

Global settings

This general configuration will be applied whatever the payment methods being used.

Name Description Value
Operating mode Defines if the payment form is displayed on the merchant’s site or on a HiPay payment page. – API: Customers will fill in their bank information directly on the merchant’s site.
– Hosted: Customers are redirected to a secured payment page hosted by HiPay.
– Hosted Fields: The customer completes his banking information directly on the merchant’s site but the form fields are hosted by HiPay. This mode is only valid for credit cards. More about Hosted fields.
Capture Defines if payments should be captured manually or automatically. Manual capture will be possible either on the order page of the PrestaShop back office or on the HiPay Enterprise back office. Please refer to the section on Capture mode. – Manual: All transactions will be captured manually either from your HiPay Enterprise back office or from your PrestaShop back office.
– Automatic: All transactions will be captured automatically.
Use One-click If the One-click option is enabled, customers will be able to use a saved credit card for their second transaction and won’t need to fill in all the payment data again. “Yes”/“No”
Customer’s cart sending The customer’s basket will be sent during the transaction. If this option is canceled, you will be able to make captures and refunds for the item. “Yes”/“No”
Keep cart when payment fails Defines if the client’s basket must be reloaded when an error occurs during payment. “Yes”/“No”
Logs information Activates debug logs.  
Activate 3-D Secure Enables and configures 3DS rules. You can choose between 5 options:
– Disabled (to bypass 3-D Secure authentication)
– Try to enable for all transactions
– Try to enable for configured 3ds rules
– Force for configured 3ds rules
– Force for all transactions
Send url Notification If so, then the url used by HiPay to send the notifications is directly filled in the order transaction. “Yes”/“No”

Hosted page

You can choose the HiPay Hosted Page on the MODULE MANAGEMENT > HIPAY MODULE > PAYMENT METHODS section of the Prestashop BO.

Once you have chosen the Hosted Page, you can activate the version 2 by following the next steps:

1 – Make sure that your HiPay Module is updated to the latest version.

2 – Go to the MODULE MANAGEMENT > HIPAY MODULE > PAYMENT METHODS section of the Prestashop module.

3 – Enable the API V2 (see image below).

4 – Save the configuration.

We strongly recommend you to to use the Hosted Page version 2, as it provides a better payment experience and it is fully customizable on HiPay Console. You can find more information in this article.

If you have installed the module after October of 2021, the Hosted Page v2 is your default version. Otherwise, you can start using the V2 by setting the version to Hosted Page v2.


When you choose the “Hosted page“ option as operating mode, you have access to additional settings.

NameDescriptionValue
Display hosted page

Defines if the hosted page is displayed in an iFrame or with a redirect.

Useful for the version 1 and 2.

-“redirect”
-“Iframe”
Display card selector

Shows card selector on the hosted page.

Only useful for the version 1.

“Yes”/“No”
CSS URL

URL of your CSS (cascading style sheet) to customize your hosted page or iFrame

Only useful for the version 1.

Https URL

HOSTED FIELDS

When you choose the “Hosted Fields“ option as operating mode, you have access to additional settings.

Name
color
fontFamily
fontSize
fontWeight
placeholder Color
caretColor
iconColor

Those parameters allows you to override default CSS properties in hosted form fields.

To override the default template, please refer to the PrestaShop documentation (doc.) and the HiPay SDK JS documentation (doc.).

CREDIT CARD

This section allows you to configure payment cards. By default, all card types are enabled and set to default. For each type of card, you can then define a different configuration.

NameDescriptionValue
ActivatedAllows or not customers to use this type of card.“Yes” / “No”
If the card type is not activated, customers will have a warning message upon payment, inviting them to use another type of card.
Minimum order amountIndicates a minimum threshold for the type of card available for payment.Amount with default currency
If the amount is not reached, customers will have a warning message upon payment, inviting them to use another type of card.
Maximum order amountIndicates a maximum threshold for the type of card available for payment.Amount with default currency
If the amount is not reached, customers will have a warning message upon payment, inviting them to use another type of card.
CurrenciesCurrencies for which the card type will be activated. These are the installed and active currencies on your shopSelection of one or more currencies
CountriesCountries for which the card type will be activatedSelection of one or more countries

LOCAL PAYMENTS

Local payments include all payments other than bank cards. Through this interface, you can activate payment methods like Oney Facily Pay, PayPal, SEPA Direct Debit, etc. Configuration is done as for credit cards, except for certain local payments: “currencies” and “countries” cannot be modified. You can also define the following elements for each payment method:
Name Description Value
Display name Name displayed on the PrestaShop checkout page String
Front positioning Allows you to display payment methods. Number

Payment Configuration

“Capture” mode

When making a purchase in “capture” mode, the capture is automatically requested right after authorization. For more information about requesting a new order (operation), please refer to our Developer Portal.
      • If the payment fails, the customer is redirected to an error page and the status is defined as “CANCELED“.
      • If the payment is successful, the customer is redirected to the success page and the status is defined as “CAPTURE REQUESTED“.

“Automatic” mode

When making a purchase in “automatic” mode, the transaction status will be “AUTHORIZED“ until you ask for the capture. For more information about requesting a new order (operation), please refer to our Developer Portal. Customers are not charged directly: you have 7 days to “capture” the order and charge the customer. Otherwise, the order is canceled.
      • If the authorization fails, the customer is redirected to an error page and the status is defined as “CANCELED“.
      • If the authorization is successful, the customer is redirected to the success page and the status is defined as “AUTHORIZED“.

Manual Capture

To capture a transaction in your PrestaShop back office, select “Orders“ -> “Orders“ and select any order. The order status should be “Payment authorized”. In “HIPAY ACTIONS”, in the “Manage Capture” section, you can make captures. Captures may be either complete or partial. Complete captures: The total amount of the transaction is captured. Partial captures: When you select “Capture type”: “Partial”, the products in the customer’s basket are displayed with the unit prices and the number of products that can be captured. You can capture delivery charges and applicable discounts, and choose the number of products to capture. The amount is updated based on the number of selected items.

Once the first capture is done, the order status changes to “Payment accepted”. The remaining amount to be captured and the amount already captured are updated.

You can also do the “capture” directly in your HiPay Enterprise back office. The order will be automatically updated in your PrestaShop back office. Please note: it only works for total captures (not partial).

If the customer basket is not sent with the transaction, then the partial capture will be executed with a free amount.

REFUNDS

To refund a transaction in your PrestaShop back office, select “Orders“ -> “Orders“ and select any order. The order status should be “Payment accepted“. In “HIPAY ACTIONS”, in the “Manage Capture” section, you can make refunds. Refunds may be either complete or partial. Complete refunds: The total amount of the transaction is refunded. Partial refunds: When you select “Refund type”: “Partial”, the products in the customer’s basket are displayed with the unit prices and the number of products that can be refunded. You can refund delivery charges and applicable discounts, and choose the number of products to refund. The amount is updated based on the number of selected items.

You can also make a “refund” directly in your HiPay Enterprise back office. The order will be automatically updated in your PrestaShop back office.

If the customer basket is not sent with the transaction, then the refund capture will be executed with a free amount.

You can also do the “refund” directly in your HiPay Enterprise back office. The order will be automatically updated in your Magento Admin Panel. NOTE: It only works for total refunds (not partial).

 If you make a partial capture or refund from your HiPay Enterprise back office, it will not be possible to make a capture or refund from your PrestaShop back office.

MO/TO PAYMENT

To make an order for your customers in a MO/TO process and thus use the correct ECI and the identifiers you have entered in the module configuration you will need:
      • In the Summary tab of the order before confirming the order, enter the value of Payment with “Hipay Enterprise” and the value of Order Status to “Waiting for payment MO/TO” and confirm the order with the button “Create the order”
      • Refresh the order and access the “Hipay Action” tab and confirm the order with the “Pay Order MO/TO” button. You will be redirected to a payment page or you will be able to fill in the information provided by your customers.