HiPay Professional is fully integrated into WiziShop, allowing you to accept payments from your WiziShop online store. You don’t need any technical knowledge in order to leverage this turnkey integration.
Prerequisites
You need a WiziShop account. If you don’t have one yet, you can create a store directly on the WiziShop website.
Configuration
You don’t need to install any software in order to make this integration work. You just need to configure it through the WiziShop back office. Please follow the steps below in order to plug HiPay Professional to WiziShop.
1. WiziShop back office payment section
Log in to the WiziShop back office and go to the payment section. Once logged in, move your cursor over “Configuration“ in order to display the sub-menu and click on the “Paiement“ tab. Then look for the HiPay integration and click on the button to add it:

2. HiPay Professional account
If you don’t have a HiPay Professional account yet, create one by clicking on the link displayed on the WiziShop back office. If you already have one, you can skip this step:

3. HiPay Professional back office
Log in to your HiPay Professional back office. To do so, go to the HiPay website, click on “Login” and choose “Professional”.
4. API Credentials
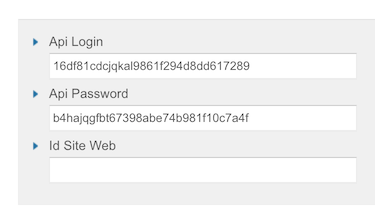
In the HiPay Professional back office, click on the API link of the Integration menu, then look for your credentials. Copy and paste the API Login and API Password into WiziShop, as follows:

5. Website Information
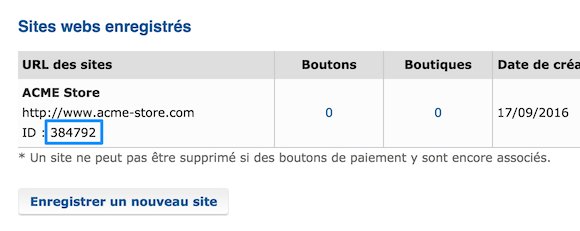
In your HiPay Professional back office, go to the websites section. Then look for your website ID, as follows:

Finally, copy and paste this website ID into WiziShop.
Do not forget to choose a category of product when the category selector appears below the website ID field.
6. Payment workflow customization (optional)
Optionally, you can customize the payment workflow by clicking on the link allowing you to do so in the WiziShop back office. For example, these options allow you to change the payment logo as well as its label. These options are visible by clicking on the link at the bottom of the page, above the “Sauvegarder” button.
7. Save
When your integration is configured, click on the “Sauvegarder” button at the bottom of the page.
And that’s it! Your payment workflow is all set on your WiziShop store. Please make a test order on your store in order to confirm that everything works well.