HiPay easily integrates with industry-standard e-commerce platforms & mobile apps. Try out our developer tools, read our docs, contact our support team.
WiziShop Enterprise
HiPay Enterprise is fully integrated into WiziShop, allowing you to accept payments from your WiziShop online store. You don’t need any technical knowledge in order to leverage this turnkey integration.
Prerequisites
You need a HiPay Enterprise account. If you don’t have an account yet, please create one by clicking on the “Sign Up” button on the HiPay website or contact us.
You also need a WiziShop account. If you don’t have one yet, you can create a store directly on the WiziShop website.
Configuration
You don’t need to install any software in order to make this integration work. You just need to configure it through the WiziShop back office. Please follow the steps below in order to plug HiPay Enterprise to WiziShop.
1. WiziShop back office payment section Log in to the WiziShop back office and go to the payment section.
Once logged in, move your cursor over “Configuration“ in order to display the sub-menu and click on the “Paiement“ tab, then look for the HiPay integration and click on it:
2. Configuration
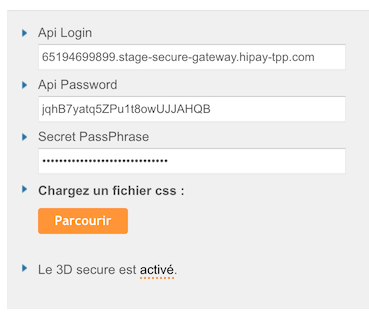
Please follow the configuration steps described on the WiziShop back office’s HiPay Enterprise integration page. You will need to log in to the HiPay Enterprise back office to retrieve your Api Login and Password as well as your Secret PassPhrase in order to configure the integration.
At the end of the configuration, you should have filled in the form as follows:
3. Payment workflow customization (optional)
You may customize the payment page by uploading your own CSS (cascading style sheet) file. For more information, please refer to the Hosted Page documentation. You will be able to upload your CSS file by using the appropriate button on the WiziShop back office.
Optionally, you can customize the payment workflow by clicking on the link allowing you to do so in the WiziShop back office. For example, these options allow you to change the payment logo as well as its label. These options are visible by clicking on the link at the bottom of the page, above the “Sauvegarder” button.
4. Save
When your integration is configured, click on the “Sauvegarder” button at the bottom of the page.
Now, you can make a test order on your store in order to confirm that everything works well. Once you are ready to use it live, switch the environnement to Production (the Module Status should be “Active” once done properly).
And that’s it! Your payment workflow is all set on your WiziShop store.