The 1-Click is the technique allowing customers to make purchases with payment information already registered to complete their purchase faster.
The purpose of this documentation is to explain the implementation of the one-click feature with HiPay SDKs by giving the possibility to select a saved card or add a new one in your payment page.
In this demonstration, we use a front-end written in HTML/CSS with Javascript (jQuery) and backend server written in PHP. All examples written in this document are for reference only, you should not implement them in production.
User Experience
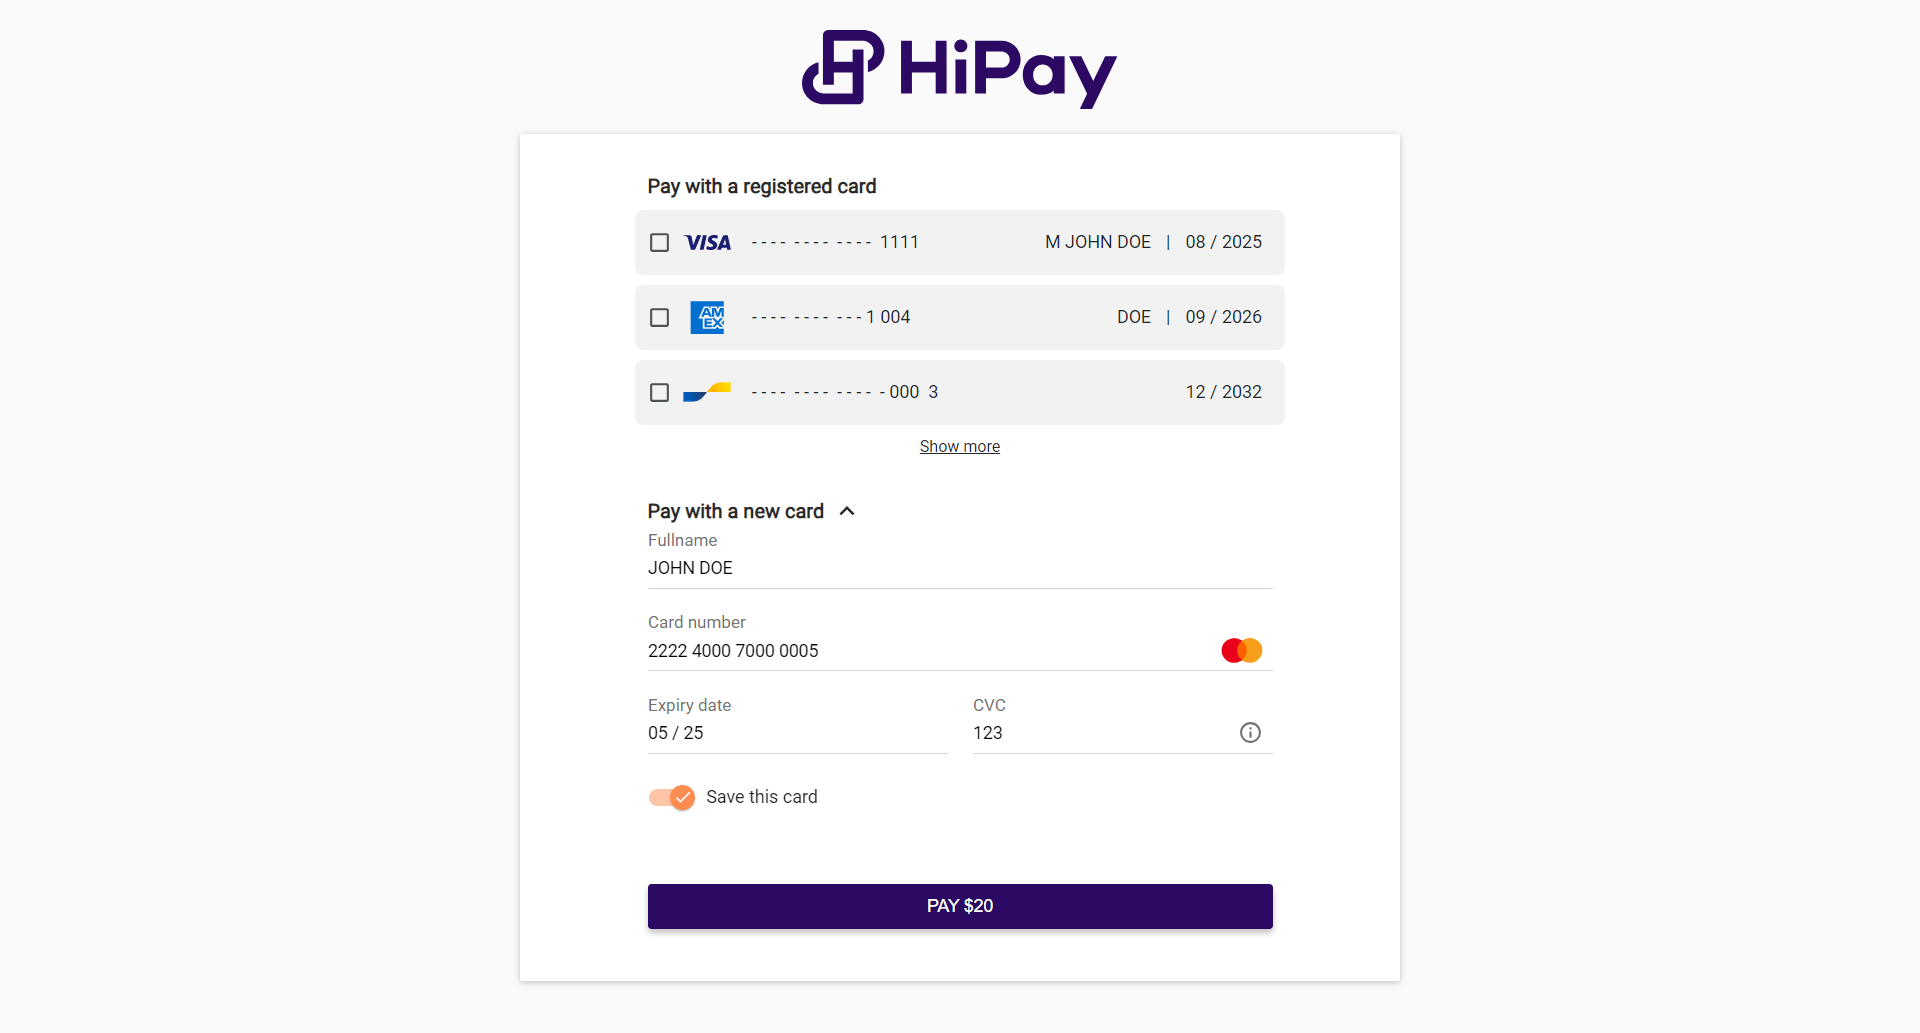
The following screenshots are generated visuals by our JS SDK that could be displayed on payment page of an order with a total amount of $20. The user has to choose one of his saved cards or to use a new card. The saved cards were previously tokenized during a payment of the same customer.
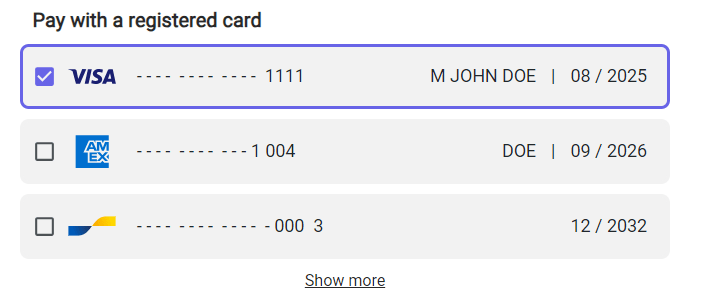
Card displaying
Each card is composed of an input radio button that includes token in its attributes. The associated credit card logo is displayed with the masked PAN and the name of the cardholder, if it has been informed, with the expiry date.
The JS SDK provides an option to display a specific count of saved cards. In the below screenshot, it displays 3 cards and the additionnals ones are only visible if the customer clicks on the Show more button. By default, the JS SDK will display all of the saved cards of a customer.
It also provides a color customization of the checkbox and the border on registered card blocks. The color applies on both elements with the same option. By default, the color is green.
Note : only valid registered cards will be displayed on the form. Expired cards will not.
For a better user experience, you have to store the tokenized informations about the filled card in a secured place like a specific table of your database. The tokenized informations can be retrieved from the getPaymentData function of the card instance.
Here is an exemple of a SQL table schema you could add use to save card informations of your customers which are using 1-Click feature :
CREATE TABLE `customer_card_informations` (
    `id` BINARY(16) NOT NULL,
    `customer_id` BINARY(16) UNIQUE NOT NULL,
    `name` VARCHAR(100) NOT NULL, -- A name to describe a customer card
    `card_token` VARCHAR(32) NOT NULL,
    `card_brand` VARCHAR(100) NOT NULL,
    `card_pan` VARCHAR(40) NOT NULL,
    `card_expiry_month` VARCHAR(2) NOT NULL,
    `card_expiry_year` VARCHAR(4) NOT NULL,
    `card_holder` VARCHAR(100) NULL,
    `status` INT(4) NOT NULL DEFAULT 1, -- If you want to let the customer to activate/deactivate his saved cards
    `created_at` DATETIME NOT NULL,
    PRIMARY KEY (`id`)
)
ENGINE=InnoDB
DEFAULT CHARSET=utf8mb4;
For a better user experience, you have to store the tokenized informations about the filled card in a secured place like a specific table of your database. The tokenized informations can be retrieved from the getPaymentData function of the card instance.
Here is an exemple of a SQL table schema you could add use to save card informations of your customers which are using 1-Click feature :
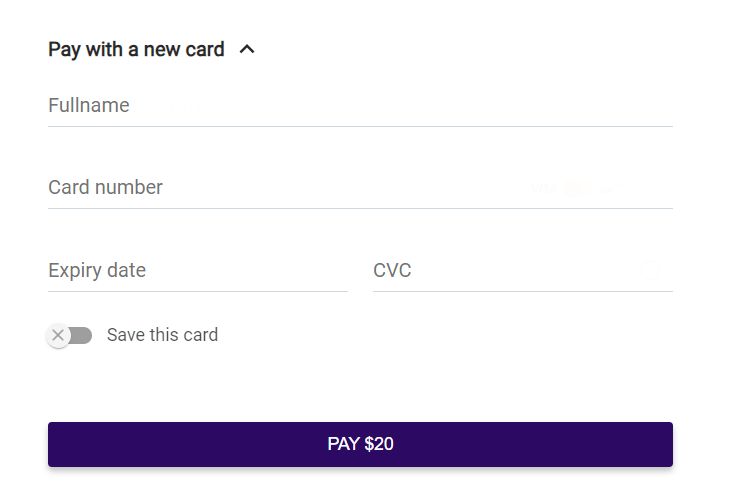
New card
The customer has the option to add a new card if needed. This form in the example is generated with the Hostedfields feature presents in the HiPay JS SDK.
With 1-Click feature, the form will also display a switch button for asking the customer if he wants to save his card.
The JS SDK also provides a color customization on the switch button when it’s checked. By default the color is green.
Front-End
Card tokenization
When we have tokenized cards, the multi_use parameter was sent with the true value, so this card could be reused for a future payment. Card tokens are written directly into HTML tags of the page.
<div class="payment">
  <form class="hipay-form" id="hipay-form">
    <div id="card-container"></div>

    <div class="submit-container">
      <button type="submit" class="hipay-submit-button" id="hipay-submit-button" disabled="true">
        PAY $20
      </button>

      <div class="hipay-result" id="hipay-result">
        <pre id="hipay-result-token"></pre>
      </div>
    </div>
  </form>
</div>
To use HiPay Javascript SDK, you have to create an HiPay object named hipayInstance in this example. Then you have to create card instance joined by the selector parameter to the card-container div with template set to auto.
hipayInstance = HiPay({
  username: CREDENTIALS_PUBLIC_USERNAME,
  password: CREDENTIALS_PUBLIC_PASSWORD,
  environment: 'production',
  lang: 'en'
});

var config = {
  selector: 'card-container',
  template: 'auto',
};

cardInstance = hipayInstance.create('card', config);
If you want to show previously tokenized cards of a customer, you have to configure a one_click parameter before creating the card instance.
The one_click parameter is an object including some required properties. Especially, the cards property allows to provide the token informations for several cards : token, brand, masked pan, expiry date and card holder.
var config = {
  selector: 'card-container',
  template: 'auto',
};

config.one_click = {
  enabled: true,
  cards: [{
      token: '952dbcfd511f3b6b474a18feae47811d0994c24823f518e911687093fc1a183a',
      brand: 'visa',
      pan: '411111xxxxxx1111',
      card_expiry_month: '08',
      card_expiry_year: '2025',
      card_holder: 'M JOHN DOE'
    },
    {
      token: '952dbcfd511f3b6b474a18feae47811d0994c24823f518e911687093fc1a183d',
      brand: 'american-express',
      pan: '371449xxxxx1004',
      card_expiry_month: '09',
      card_expiry_year: '2026',
      card_holder: 'JANE DOE'
    },
  ]
}

cardInstance = hipayInstance.create('card', config);
Send payment data to the server
In the first step, we have created the front-end checkout with our two cards and the forced CVC. Now, for sending payment data, we use AJAX call when the user clicked on the pay button.
$('#hipay-form').submit(function () {
  // Display a progress bar
  $('#hipay-progress').show();
  // Disabled the pay button when processing
  $('#hipay-submit-button').disabled = true;

  cardInstance.getPaymentData().then(
    function (response) {
      // Send payment data in JSON format to your server with an AJAX call
      $.ajax({
        url: 'https://your-backend-url/',
        type: 'POST',
        data: JSON.stringify(response),
        contentType: 'application/json; charset=utf-8',
        dataType: 'json',
        success: function (result) {
          // Save the transaction response (transaction_number, order_id and foward_url)
          sessionStorage.setItem('response_order', JSON.stringify(result));
          // Load the forward url
          window.location = result.forward_url;
        },
        complete: function () {
          // Hide the progress bar
          $('#hipay-progress').hide();
        }
      });
    }
  );
});
Back-End
This provided code is used in the back-end server. In this example code, we create a HiPay transaction with all required data. We send the request order with the PHP HiPay SDK, and we create a JSON response sent to the front-end.
For One-Click transactions, including the first transaction and the subsequent ones, you have to inform the one_click parameter at true value during the Order request. Make sure to also provide the eci parameter at 7 value.
<?php

$logins = [
    'login' => $credentials['private']['login'],
    'password' => $credentials['private']['password'],
];

$data = [
    'orderid' => 'POC_ONE_CLICK_' . rand(),
    'operation' => 'Sale',
    'eci' => 7,
    'accept_url' => $FRONDEND_URL . '/?type=accept',
    'decline_url' => $FRONDEND_URL . '/?type=error',
    'cancel_url' => $FRONDEND_URL . '/?type=error',
    'language' => 'fr_FR',
    'email' => '[email protected]',
    'custom_data' => '{"item 1":"Large Mocha Latte", "item 2":"Banana Nut Muffin"}',
    'time_limit_to_pay' => 90,
    'authentication_indicator' => 1,
    // ...
];

try {
    //Get JSON data from front-end
    $receivedData = json_decode(file_get_contents('php://input'), true);

    //Set reponse code  at 200
    http_response_code(200);

    $config = new \HiPay\Fullservice\HTTP\Configuration\Configuration([
        'apiUsername' => $logins['login'],
        'apiPassword' => $logins['password']
    ]);
    $clientProvider = new \HiPay\Fullservice\HTTP\SimpleHTTPClient($config);
    $gatewayClient = new \HiPay\Fullservice\Gateway\Client\GatewayClient($clientProvider);

    //Instantiate order request
    $orderRequest = new \HiPay\Fullservice\Gateway\Request\Order\OrderRequest();
    $orderRequest->orderid = $data['orderid'];
    $orderRequest->operation = $data['operation'];
    $orderRequest->description = $data['description'];
    $orderRequest->long_description = $data['long_description'];
    $orderRequest->accept_url = $data['accept_url'];
    $orderRequest->decline_url = $data['decline_url'];
    $orderRequest->pending_url = $data['pending_url'];
    $orderRequest->exception_url = $data['exception_url'];
    $orderRequest->cancel_url = $data['cancel_url'];
    $orderRequest->notify_url = $data['notify_url'];
    $orderRequest->language = $data['language'];
    $orderRequest->custom_data = $data['custom_data'];
    $orderRequest->payment_product = $receivedData['payment_product'];
    // Set one_click parameter to true value if the transaction is realized with an existing tokenized card
    $orderRequest->one_click = $receivedData['one_click'];

    $paymentMethod = new \HiPay\Fullservice\Gateway\Request\PaymentMethod\CardTokenPaymentMethod();
    $paymentMethod->eci = $data['eci'];
    $paymentMethod->authentication_indicator = $data['authentication_indicator'];
    $paymentMethod->cardtoken = $receivedData['token'];
    $orderRequest->paymentMethod = $paymentMethod;

    $customerBillingInfo = new \HiPay\Fullservice\Gateway\Request\Info\CustomerBillingInfoRequest();
    $customerBillingInfo->email = $data['email'];
    $customerBillingInfo->phone = $data['phone'];
    $customerBillingInfo->birthdate = $data['birthdate'];
    $customerBillingInfo->gender = $data['gender'];
    $customerBillingInfo->firstname = $data['firstname'];
    $customerBillingInfo->lastname = $data['lastname'];
    $customerBillingInfo->country = $data['country'];
    $customerBillingInfo->recipientinfo = $data['recipientinfo'];
    $customerBillingInfo->streetaddress = $data['streetaddress'];
    $customerBillingInfo->streetaddress2 = $data['streetaddress2'];
    $customerBillingInfo->city = $data['city'];
    $customerBillingInfo->state = $data['state'];
    $customerBillingInfo->zipcode = $data['zipcode'];
    $orderRequest->customerBillingInfo = $customerBillingInfo;

    //Send the request order
    $transaction = $gatewayClient->requestNewOrder($orderRequest);

    $response = [
        'transaction_number' => $transaction->getTransactionReference(),
        'order_id' => $transaction->getOrder()->getId(),
        'forward_url' => (!$transaction->getReason() ? $data['accept_url'] : $data['cancel_url']),
    ];

    // This response is send to the front-end at the success of AJAX call
    echo json_encode($response);

} catch (\Exception $e) {
    $response = [
        'error_message' => $e->getMessage(),
    ];

    // This response is send to the front-end at the failure of AJAX call
    echo json_encode($response);
}
Transaction Status
The server sent the response the forward URL of the transaction in the AJAX call, with the transaction number and the order ID. The windows.location function will redirect the customer to the final page. If we have a success page, the url will be https://FRONDEND_URL/?type=accept and https://FRONDEND_URL/?type=decline if failure.
HiPay JS SDK
To get started, include the HiPay JavaScript SDK on your HTML page.
The following link exposes a global variable, HiPay, as a function to initialize the SDK with your public credentials and your configuration.
<script type="text/javascript" src="https://libs.hipay.com/js/sdkjs.js"></script>
Then, create an instance of the HiPay JavaScript SDK. You must replace HIPAY-PUBLIC-USERNAME and HIPAY-PUBLIC-PASSWORD with the public credentials of your main HiPay Account.
var hipay = HiPay({
    username: 'HIPAY-PUBLIC-USERNAME',
    password: 'HIPAY-PUBLIC-PASSWORD',
    environment: 'stage',
    lang: 'en'
});
Add in your payment web page, a new container where the registered cards and a card form will be displayed.
<body>
    <form class="hipay-form" id="hipay-form">
        <div id="card-container"></div>
        <button type="submit" id="hipay-submit-button" disabled="true">PAY</button>
    </form>
</body>
One Click Card Container
To create this container, call the create function with the first argument card and a second one with the configuration of your card container.
Note: Some parameters below in card config are optionnal.
// Configuration
const oneClick = {
  enabled: true,
  cards_display_count: 3,
  cards: [{
      token: '952dbcfd511f3b6b474a18feae47811d0994c24823f518e911687093fc1a183a',
      brand: 'visa',
      pan: '411111xxxxxx1111',
      card_expiry_month: '08',
      card_expiry_year: '2025',
      card_holder: 'M JOHN DOE'
    },
    {
      token: '952dbcfd511f3b6b474a18feae47811d0994c24823f518e911687093fc1a183d',
      brand: 'american-express',
      pan: '371449xxxxx1004',
      card_expiry_month: '09',
      card_expiry_year: '2026'
    }
  ]
};

const options = {
  selector: 'card-container',
  template: 'auto',
  one_click: oneClick
};

const cardInstance = hipay.create(
  'card',
  options
);
Payment
When the user has selected a registered card and clicked on the Pay button, the payment will be processed with the selected card.
The token of the saved card will be updated using Tokenization API to check if it’s still valid before processing the order.
If the user did not select a registered card but filled the classic card formular and clicked on the Pay button, the payment will be processed using card informations from the formular.
If the user has clicked on the “Save this card” button before to pay, the card token could be used several times without asking some card informations, as the CVC.
// Get formElement
const cardForm = document.getElementById('hipay-form');
// Add event listener on form submit
cardForm.addEventListener('submit', function (event) {
  event.preventDefault();

  cardInstance.getPaymentData().then(
    function (response) {
      if(response.multi_use) {
        // Store this card using response variable
      }
      // Pay with API order
    },
    function (errors) {
      // Handle errors
    }
  );
});
JS SDK Reference
CREATE
var instance = hipay.create('card', options);| Name | Type | Description |
| one_click | object | The One Click object which includes the saved cards informations and some general informations. |
| template | string | If set to auto, it activates the generation of the HTML form template automatically. |
| selector | string | Unique div id to generate the button. |
| styles | object | Object with your custom styling CSS properties.
See the Styles configuration section below for more details. |
one_click
The One Click object including the saved cards informations and some general informations.| Name | Type | Description |
| enabled | boolean | Enable or not the 1-Click feature. By default, it’s false. Enable it will display the “Save this card” switch button. |
| cards | array<SavedCard> | An array of SavedCard objects. A SavedCard object includes some required properties to display a registered card. |
| cards_display_count | number | The maximum count of visible saved cards when there are any. Additionnal cards can be displayed by clicking on the “Show more” button. By default, it’s 0 and it means displaying all saved cards. |
| Name | Type | Description |
| token required | string | The HiPay token of a previously tokenized card with multi_use at value true. Its length should be at the minimum value of 32. |
| brand
required |
string | The brand of the saved card. It can be one of the following values : visa, mastercard, cb, american-express, maestro or bcmc. |
| pan
required |
string | The Primary Account Number of the card which should be partially masked. The PAN value should match a pattern of the indicated brand. |
| card_holder | string | The card holder of the saved card, if exists. |
| card_expiry_month required | string | The card expiry month, expressed with two digits (e.g.: 01) |
| card_expiry_year required | string | The card expiry year, expressed with four digits (e.g.: 2026) |
| Name | Type | Description |
| components | object | Applies custom style on specific components. |
| Name | Type | Description |
| switch | object | Applies custom style on a swith button, like the “Save this card” button. |
| checkbox | object | Applies custom style on a checkbox button, like those for each saved cards. |
switch and checkbox have the same style configuration properties.
| Name | Type | Description |
| mainColor | string | Custom color applied on the component using hexadecimal format (e.g.: #6864E7).
About the |
const options = {
  selector: 'card-container',
  template: 'auto',
  one_click: oneClick,
  styles: {
    components: {
      switch: {
        mainColor: '#FF8C50'
      },
      checkbox: {
        mainColor: '#6864E7'
      }
    }
  }
};

const cardInstance = hipay.create(
  'card',
  options
);