The HiPay Desktop Connector allows you to process in store payments and create a transaction on HiPay Console.
The payment workflow is the following one:
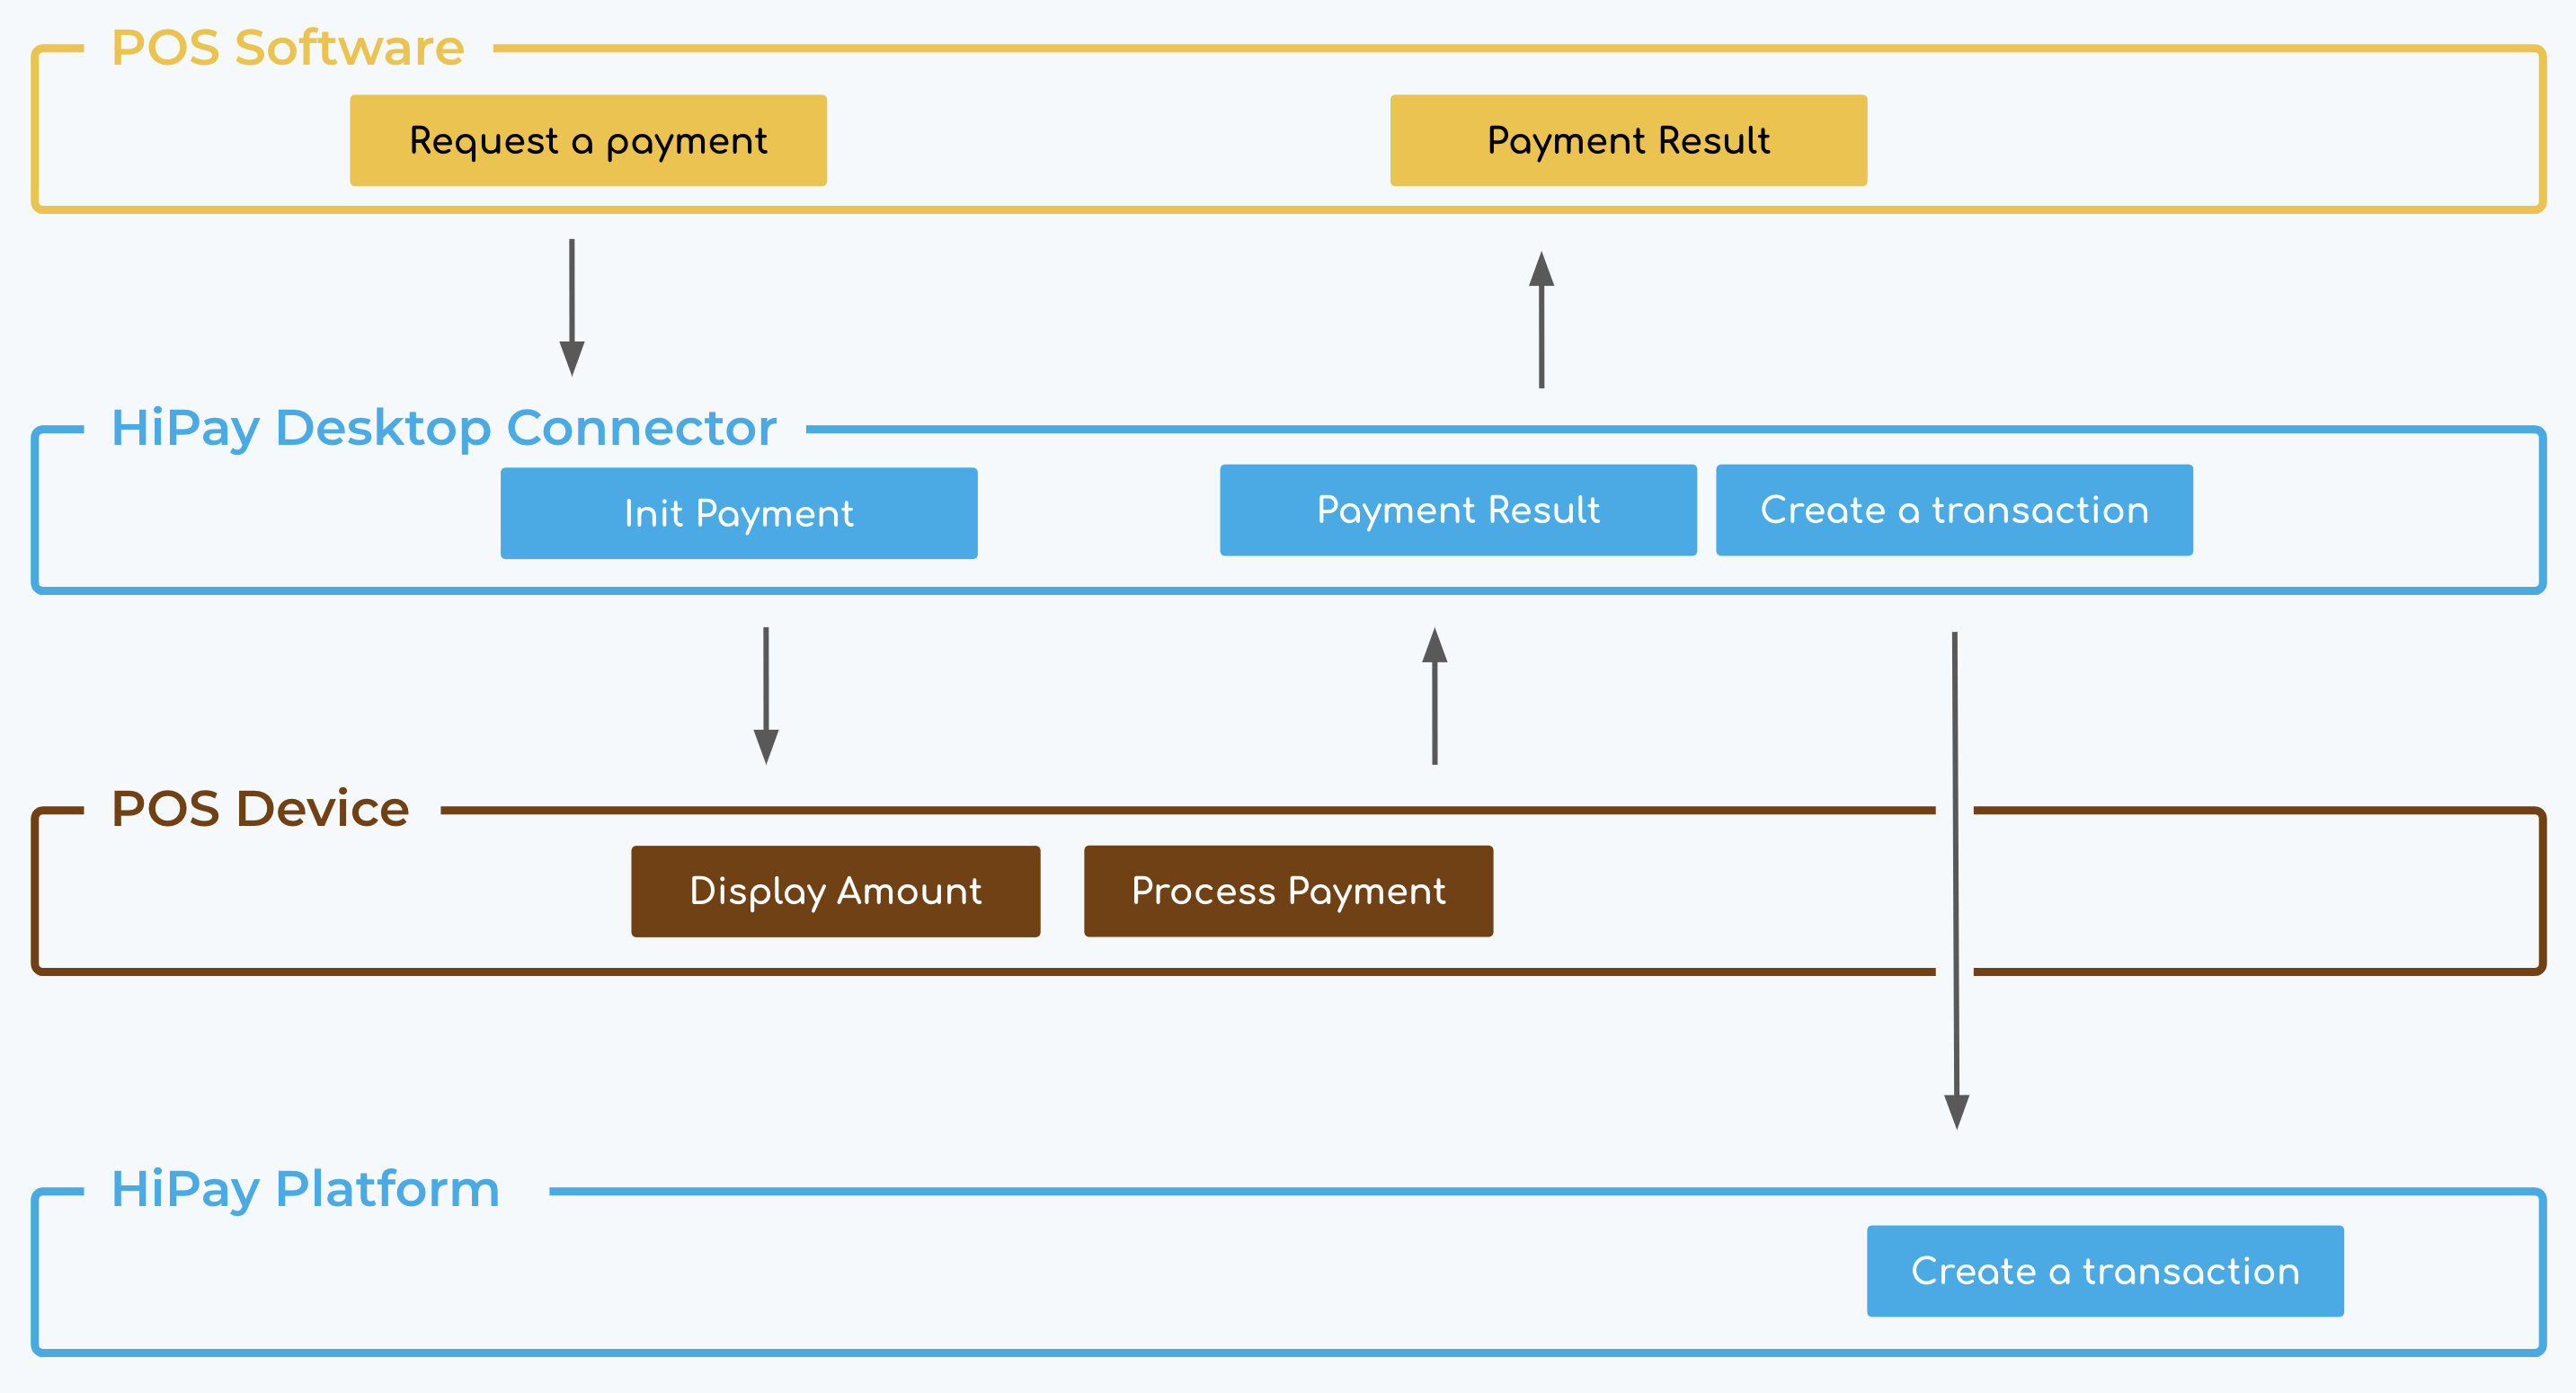
The point-of-sale software sends a request payment to the Desktop Connector.
Desktop Connector initializes the payment on the POS Terminal e.g the amount is displayed on the screen and the customer should process the payment.
POS Terminal sends the result payment to the Desktop Connector in its format.
Desktop Connector sends the result to the point-of-sale software with a custom object.
Transaction request is sent to HiPay’s server
Installation
In order to install the connector, you need to follow the next steps:
FILE OBTENTION
header "x-authorization: Basic {API_CREDENTIALS}"
Exemple:
Stage
curl "https://stage-api.hipay.com/v1/ecr/versions/setup?os=windows_64&type=concertv2" --header "x-authorization: Basic {API_CREDENTIALS}" --output setup-concertv2-windows_64.zip
Production
curl "https://api.hipay.com/v1/ecr/versions/setup?os=windows_64&type=concertv2" --header "x-authorization: Basic {API_CREDENTIALS}" --output setup-concertv2-windows_64.zipWhere {API_CREDENTIALS} : base64(login:password)
IDENTIFY THE PORT
If you don’t know the local port used by the terminal, please start your terminal and connect it to the windows computer who runs the Desktop connector.
Then, download and install the USBDeview software from this URL. When launching the USBDeview software, you can identify the local port in the Drive letter column from a device name that becomes green when you plug the terminal.
FILE EXECUTION
Once you have the file, unzip it.
Then, launch the script setup.exe:
Installing HiPay ECR Connector...
? Enter your HiPay username 12345678.stage-secure-gateway.hipay-tpp.com
? Enter your HiPay password Test_qVpLbNOWemB7SCcnuqQoT3Yu
? Select the installation folder. /home/user/connector
? Which serial port is connected to the payment terminal ? COM14
? Enter the payment terminal serial number 1234567890
? Select the local port for the API 8888
? local API username log
? local API password [hidden]
? Running environment dev
? Authorization Threshold 100
? When to update the application 03:00

We will now enter your contracts details
? What type of contract do you have ? both
? Enter your payment_application for proxy 001
? Enter your payment_application for NFC 00B
? Enter your merchant ID for proxy 1234567
? Enter your merchant ID for NFC 1234568
? Enter the terminal rank for proxy 001
? Enter the terminal rank for NFC 001

Installation completed with success ! Your config is as follow:
{
  "baudRate": 9600,
  "dataBits": 8,
  "parity": "none",
  "stopBits": 1,
  "hipay_login": "12345678.stage-secure-gateway.hipay-tpp.com",
  "hipay_password": "Test_qVpLbNOWemB7SCcnuqQoT3Yu",
  "serial_port": "COM14",
  "serial_number": "1234567890",
  "local_port": "8888",
  "api_username": "log",
  "api_password": "pwd",
  "environment": "dev",
  "authorization_threshold": 100,
  "update_time": "03:00",
  "contract": {
    "proxy": {
      "payment_application": "001",
      "merchant_id": "1234567",
      "rank": "001"
    },
    "nfc": {
      "payment_application": "00B",
      "merchant_id": "1234568",
      "rank": "001"
    }
  }
}
You can change your config, by editing the yaml file at: /home/user/connector/hipay/ecr-connector/bin/data/config.yml
Press  a key to start the service tp-manager and check for update
Press any key to exit...
Then the initialization program closes and the program tp-mananger.exe starts in the background. It can be seen in the task manager under the name: Node.js: Server-side JavaScript
In order to install the connector, you need to follow the next steps:
FILE OBTENTION
header "x-authorization: Basic {API_CREDENTIALS}"
Example:
Stage
curl "https://stage-api.hipay.com/v1/ecr/versions/setup?os=linux&type=concertv2" --header "x-authorization: Basic {API_CREDENTIALS}" --output setup-concertv2-linux.zipProduction
curl "https://api.hipay.com/v1/ecr/versions/setup?os=linux&type=concertv2" --header "x-authorization: Basic {API_CREDENTIALS}" --output setup-concertv2-linux.zipWhere {API_CREDENTIALS} : base64(login:password)
IDENTIFY THE PORT
If you don’t know the local port used by the terminal, please compare 2 devices lists:
- before connecting the terminal (cmd> ls /dev)
- after connecting the terminal (cmd> ls /dev)
The new device that appears in the second list is the terminal device.
Example : /dev/ttyUSB0
GRANT THE ACCESS
You need to add the dialout group to the port used by the terminal in order to access this port. Type this unix command (and replace USER by the login used to launch this connector software) :
sudo usermod -a -G dialout USER
FILE EXECUTION
Once you have the file, unzip it.
Then launch the script setup.sh that you can find below. The goal of this script is to automatically search for the latest available version and launch the connector.
If you want to launch the connector manually, you can run the launch.sh script manually.
./setup.sh
Installing HiPay ECR Connector...
? Select the installation folder. /home/user/connector
? Which serial port is connected to the payment terminal ? COM1
? Enter the payment terminal serial number SN_123
? Select the local port for the API 3001
? local API username log
? local API password [hidden]
? Running environment prod
? Authorization Threshold 3
? When to update the application 06:15

We will now enter your contracts details
? What type of contract do you have ? proxy
? Enter your payment_application for proxy 001
? Enter your merchant ID for proxy 1234567
? Enter the terminal rank for proxy 001
Installation completed with success ! Your config is as follows:
{
  "hipay_login": "1234567.stage-secure-gateway.hipay-tpp.com",
  "hipay_password": "Test_1234567",
  "serial_port": "COM1",
  "serial_number": "SN_123",
  "local_port": 3001,
  "api_username": "log",
  "api_password": "password",
  "environment": "prod",
  "authorization_threshold": 3,
  "update_time": "06:15",
  "contract": {
	"proxy": {
  	    "payment_application": "001",
  	    "merchant_id": "1234567",
  	    "rank": "001"
	}
  }
}

You can change your config, by editing the yaml file at: /home/user/connector/hipay/ecr-connector/bin/data/config.yml

The service tp-manager has been started and will check for any update upon startup
Initialization
MANUAL LAUNCH
In order to check if the configuration is well done and everything works fine, you have to launch the ECR connector manually by executing program launch.cmd located on delivery files at the root directory.
If the program stops a few seconds after starting, one failure occurs during the program start. Please check again the previous step to modify the configuration. Kill manually tp-manager before starting the next step.
AUTOMATE THE LAUNCH
You can automate the Desktop connector launch from the computer who runs it by following the next steps:
Click on Start menu > Windows Administrative Tools > Task Scheduler.
Click on Action > Create Task
Once the Create Task screen appears, in the “Name” field, give the task name : Desktop Connector.
Select the option “Run whether user is logged on or not”.
In the “Configure for” drop down menu, select “Windows 10.
Go to the “Triggers” tab and select “New…”.
Select “Daily” Settings and let “Recur every” 1 days
In advanced settings, enable “Repeat task every” and select in the drop down menu “5 minutes”
Go to the “Actions” Tab and select “New …”.
Select “Browse…“ and find the program “always-up.cmd” (located on delivery files at the root directory) and click on the button “Open” to select this file to be scheduled for this task.
Select “OK“.
Go to the “Conditions” Tab.
Enable “Wake the computer to run this task”
Disable “Stop if the computer switches to battery power”
Then go to the “General” tab and Click on “OK”
The “Task Scheduler” login screen will appear.
Enter your password to enable the program to start on your computer and click on “Ok”.
The new task “Desktop Connector” is ready and will start in few minutes.
MANUAL LAUNCH
In order to check if the configuration is well done and everything works, you have to launch the connector manually by executing program launch.sh located on delivery files at the root directory.
If the program stops a few seconds after starting, one failure occurs during the program start. Please check again the previous step to modify the configuration. Kill manually tp-manager before starting the next step.
AUTOMATE THE LAUNCH
From your computer who run the connector, add a new line into the cron to schedule a new task that run every 2 minutes via the command crontab -e (and replace the directory /home/user/ecr/ by your own directory where you have installed the connector software) :
*/2 * * * * /home/user/ecr/always-up.sh
Payment Request
The Desktop ECR Connector allows you to make a payment, followed by an order if the payment succeed.
URL
http://localhost:{LOCAL_PORT}
Following the previous configuration example, the URL would be http://localhost:8080.
AUTH
All requests to the require identification through HTTP Basic Authentication. Your API credentials can be found in the “Integration section” of your HiPay Enterprise back office.
Most HTTP clients (including web browsers) have built-in support for HTTP basic authentication. If not, the following header must be included in all HTTP requests.
Authorization: Basic base64(‘API login’)
| Variable name | Description | Type | Values | Default |
| amount* | Total order amount, calculated as the sum of purchased items, plus shipping fees (if present), plus tax fees (if present). | Float | e.g. 9.99 | |
| transaction_type | Type of transaction to be processed | Enum | Debit | Debit |
| force_authorization | Whether the authorization should be forced or not. Overwrites the authorizationThreshold parameter to enable authorization | Boolean | False | |
| currency | ISO 4217 alpha currency code (More information) | Enum | EUR | EUR |
| order_id | Order number of your request payment. If you don’t send an identifier, we will generated it for you | String | e.g. “Order_12345” | |
| cart** | Cart object (More information) | Cart | – | |
| customer | Customer’s information object (id, firstName, lastName, email) | Customer | – | |
| custom_data | Custom data (only value type Bool / Int / Float / String are accepted) | Dictionary | – |
{
  "amount": "10,23",
  "currency": "string",
  "order_id": "Order_12345",
  "transation_type": "Debit",
  "force_authorization": false,
  "cart": {
    "european_article_numbering": 4711892728946,
    "product_reference": "NF-a1690",
    "type": "good",
    "quantity": 1,
    "name": "My first product",
    "unit_price": 8.99,
    "tax_rate": 0,
    "discount": 0,
    "total_amount": 8.99
  },
  "customer": {
    "id": 283749291,
    "firstname": "John",
    "lastname": "Doe",
    "email": "[email protected]"
  },
  "custom_data": {
    "shop": "Opera",
    "vendor": "Mario",
    "newCustomer": true,
    "event": 42
  }
}
Payment Response
After the transaction has been processed through HiPay’s servers, you will receive a response containing the following information. The response is given synchronously following the request.
| Variable name | Description | Type | Values |
| paymentStatus | Status received from the TPE regarding the payment. | Enum | SUCCESS FAILURE |
| notificationHipaySent | Indicates whether Hipay has been notified of the transaction | Boolean | e.g. false |
| numberOfNotificationSent | Indicates the number of notifications sent to Hipay. Sometimes this value can be 2 in order to ensure the financial reconciliation. | Numeric | e.g. 1 |
| errorCode | Error code | String | e.g. : “1003” |
| errorDescription | Error description | String | e.g. : “The network is unavailable” |
| amount | Amount of the transaction | Float | e.g. : 98.80 |
| currency | ISO 4217 alpha currency code | Enum | e.g. : .EUR |
| orderId | Order number | String | e.g. : “order_12345” |
| customer | Personal information of the customer | Customer |
{
  "paymentStatus": "SUCCESS",
  "notificationHipaySent": true,
  "numberOfNotificationSent": 1,
  "amount": "10,23",
  "currency": "string",
  "orderId": "Order_12345",
  "transationType": "Debit",
  "forceAuthorization": false,
  "cart": {},
  "customer": {},
  "customData": {}
}
Maintenance
The desktop connector has some additional features that allow you to handle the maintenance. The endpoints that you can use are the following ones.
GET /version
Get current version of terminal manager application.
No parameters on the request. Response:
{
  "version": "0.0.0-concertv2-winserver2003_64"
}
GET /config
Get serial number of hardware terminal
No parameters on the request. Response:
{
  "deviceId": "00000012345678"
}
GET /stop
Stop terminal manager server.
No parameters on the request. Response:
{
  "message": "TP-Manager stopped",
  "stopped": false
}